This is something I never thought I’d appreciate.
Because Sega Master System and Sega Genesis games (for the most part) come in rugged hard plastic cases (clam shells) I’ve never felt the need to protect the games in my collection. I always felt very lucky next to NES and SNES collectors who have to deal with cardboard cases. So often over the years NES and SNES boxes been beaten to a pulp or often just tossed into the trash.
Sega collectors are not entirely immune to this problem. Nearing the end of the Genesis Sega starting using cardboard cases. And just like Nintendo games it’s often hard to find good condition versions of these particular Genesis titles.
I recently purchased a few Genesis and Dreamcast games from a fellow collector on the neo-geo.com forums. When I received these games they were in clear plastic box protectors. These games actually had their original hard clam shell cases so I took out the game and used the clear protective cases for a few of my cardboard Genesis games.
What I didn’t expect how much nicer the cardboard games looked in the clear plastic boxes. They were given a shine that made them look more similar the games in the hard plastic cases. None of my cardboard cased games are in perfect shape but in these box protectors they look great. So I went online and bought ten more.
They ship flattened and padded with tissue.
One empty and one with a game.
These box protectors even come with clear circular sticker to place on the top and bottom flaps to seal the case closed. They are not needed. I spend so much time removing stickers from cases and games I don’t want to start adding them back. These cases have no trouble staying closed without these stickers.
With shipping and after the exchange from USD these ten boxes cost me $21.20 CAD. $2.12 each is not super cheap for what they are but considering I wont need many it’s certainly cheap enough and I’ll continue to do this for any cardboard cased games that I might pick-up down the road.
A few games decked out in these new boxes.
All of my newly boxed Cardboard games.
On the other spectrum of cheap are BitBoxes.
Right now I have a handful of NES and SNES cartridges in the collection. Almost all are loose carts stacked up on top of each other. Compared to my Sega games they really don’t look very nice. My good buddy Nintendo Joe also wants his collection of Nintendo games to look pretty on their shelves and his solution is to use Universal Game Cases. I was very close to doing the same but for a long while I’ve have been aware of an alternate option called BitBoxes (from stoneagegamer.com).
What held me back is the price. They are not cheap. I decided to try out a few and I bought five BitBoxes; complete with cover art. After shipping and the exchange rate they ended up costing me $12 CAD each. I suppose I’m somewhat acclimatized to the cost because of the $15 Shockboxes that I have been buying for my Neo Geo MVS games but the price is still really affecting how many I’m willing to buy at one time.
BitBoxes for some of my favorite SNES games.
Looking neat and orderly!
These BitBoxes are much lager than I thought they would be. Not near as big as ShockBoxes but definitely much larger than original SNES cardboard boxes.Each BitBox can hold one game and a manual. And they feel very durable.
It’s frustrating… why do they have to look so good?! I’m sure I’ll be getting more as time goes on. My one small saving grace is that my NES and SNES collection will never be as big as my Sega collection. I’m pretty sure about that… some what sure. Maybe? We’ll see.
So I went and have returned from VGCC’s Waterloo Video Game Swap. And something strange happened…
I went home with more money than I came with. And against all odds I did not buy a single game.
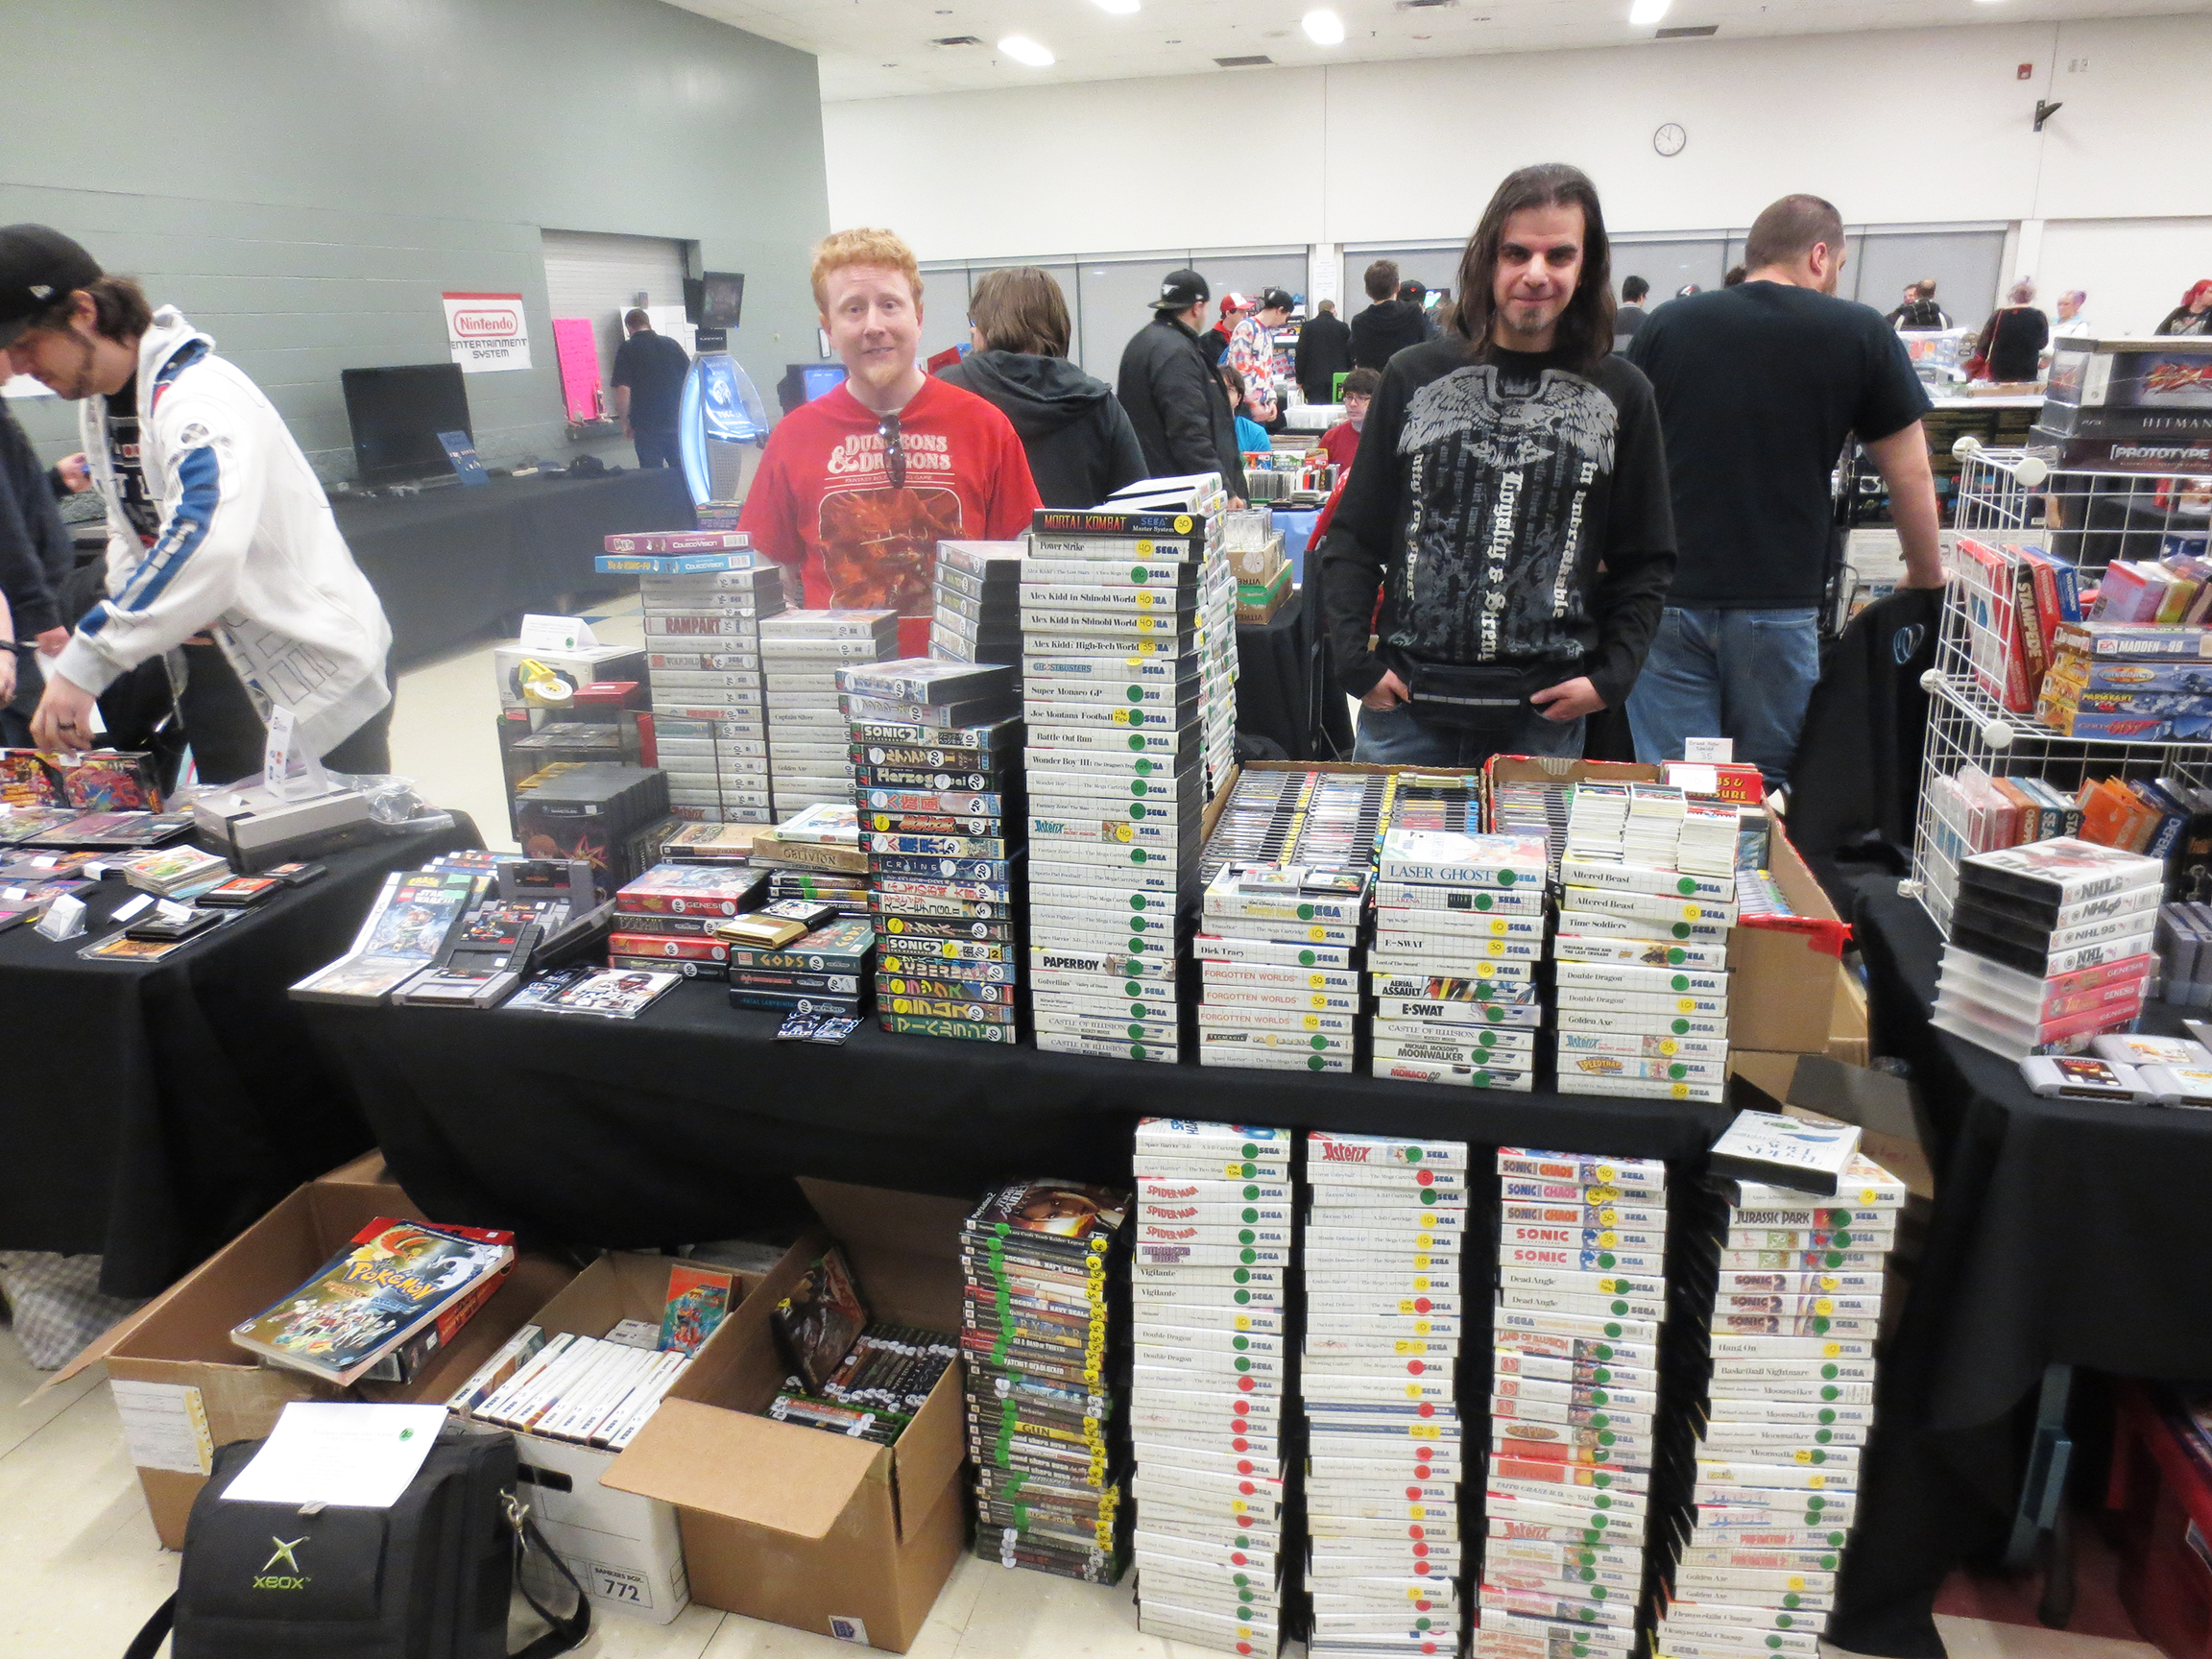
Below you can see Nintendo Joe (left) looking like someone who has been standing all day and Flavio to the right.
Flavio and I with our combined Sega Master System (SMS) and Japanese Mega Drive games dominated the Sega presence at this event. If you divide the table in half all those SMS games on the right half are Flavio’s. All the Sega stuff to the left is mine. Flavio’s commanding lead in inventory made him the day’s top earner of the three of us. Flavio said he made just about $1,000 in the five hours we were there. He also had two large boxes of NES games for sale which were very popular.
Nintendo Joe and Flavio!
For myself, I was selling a lot of cheap and often complete Sega Master System games and I thought more would sell. People in Canada seem to be very Nintendo crazy 🙂 But I did sell some; including SMS, Mega Drive, Genesis, ColecoVision and maybe one or two PS2 and xbox original games.
Since Nintendo Joe picked us up and did all the driving Flavio and I split the cost of the table and gas. After my expenses I went home with an extra $260. It’s not amazing but it’s OK.
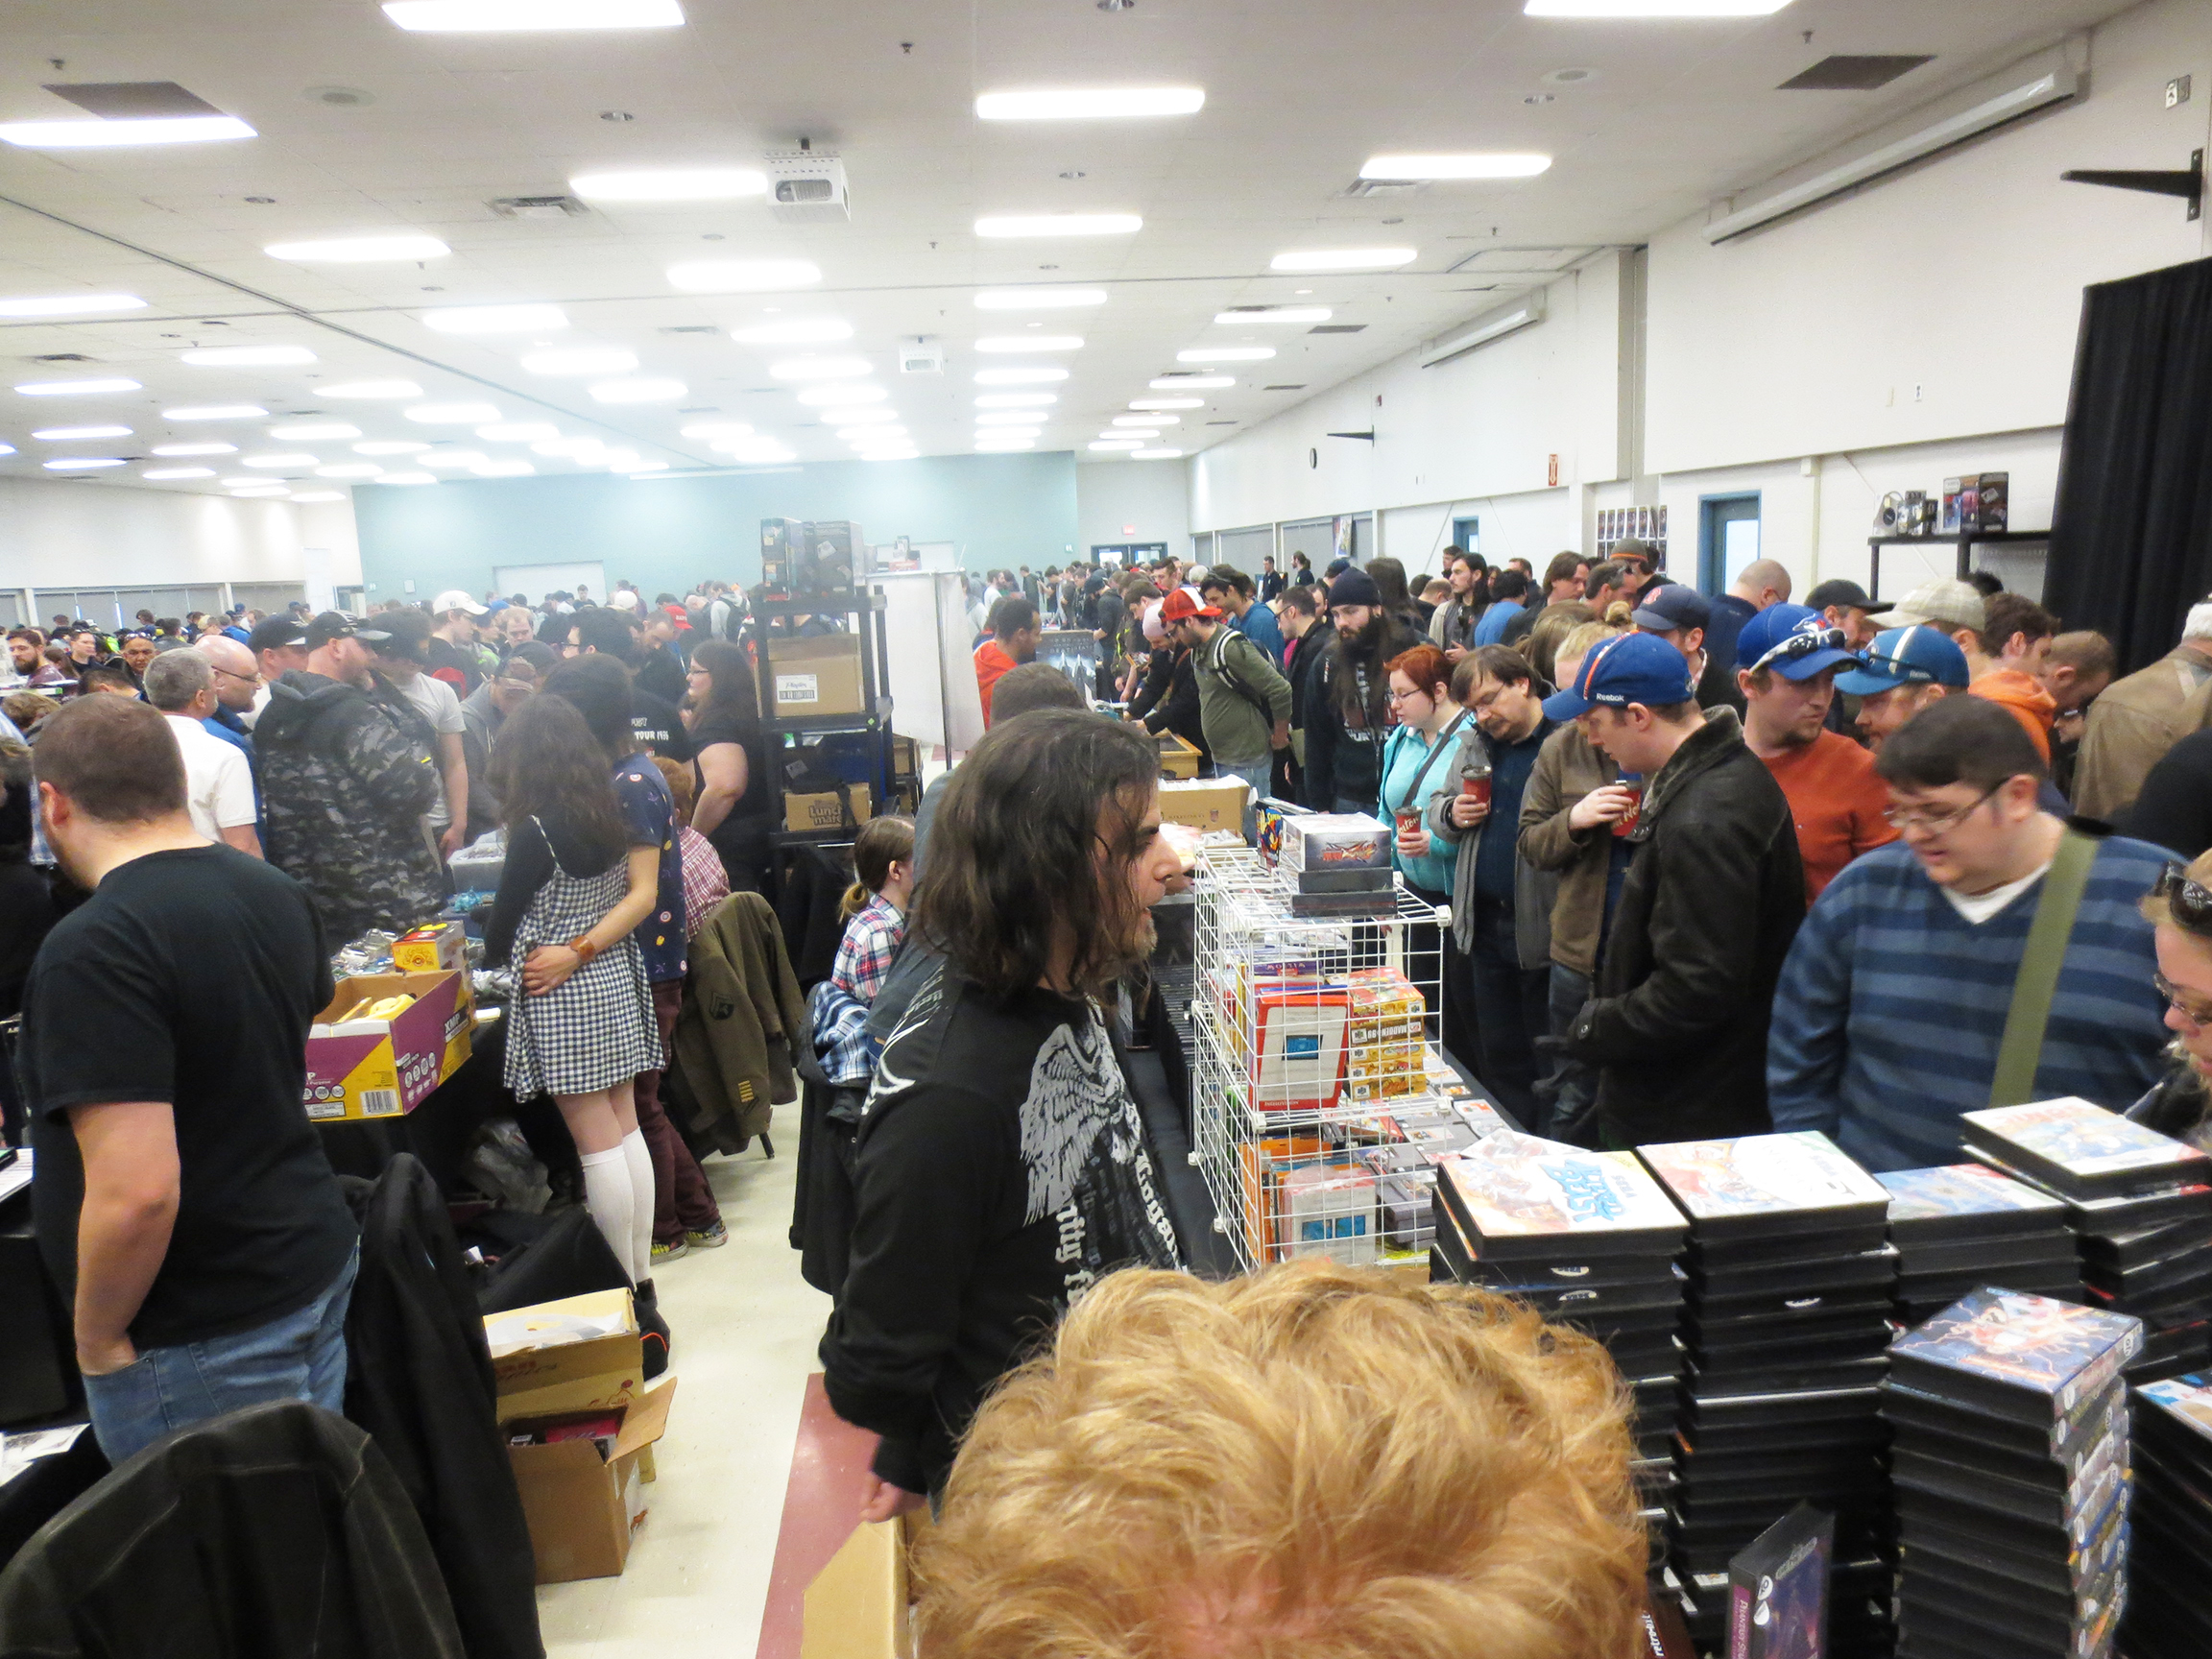
Busy Busy!
I don’t know Nintendo Joe’s final tally but I’m sure he’ll be posting it soon at MyNintendoDimension. As you can see from the image above this small venue was packed. Which is why we all did so well. People were having a very hard time just walking around!
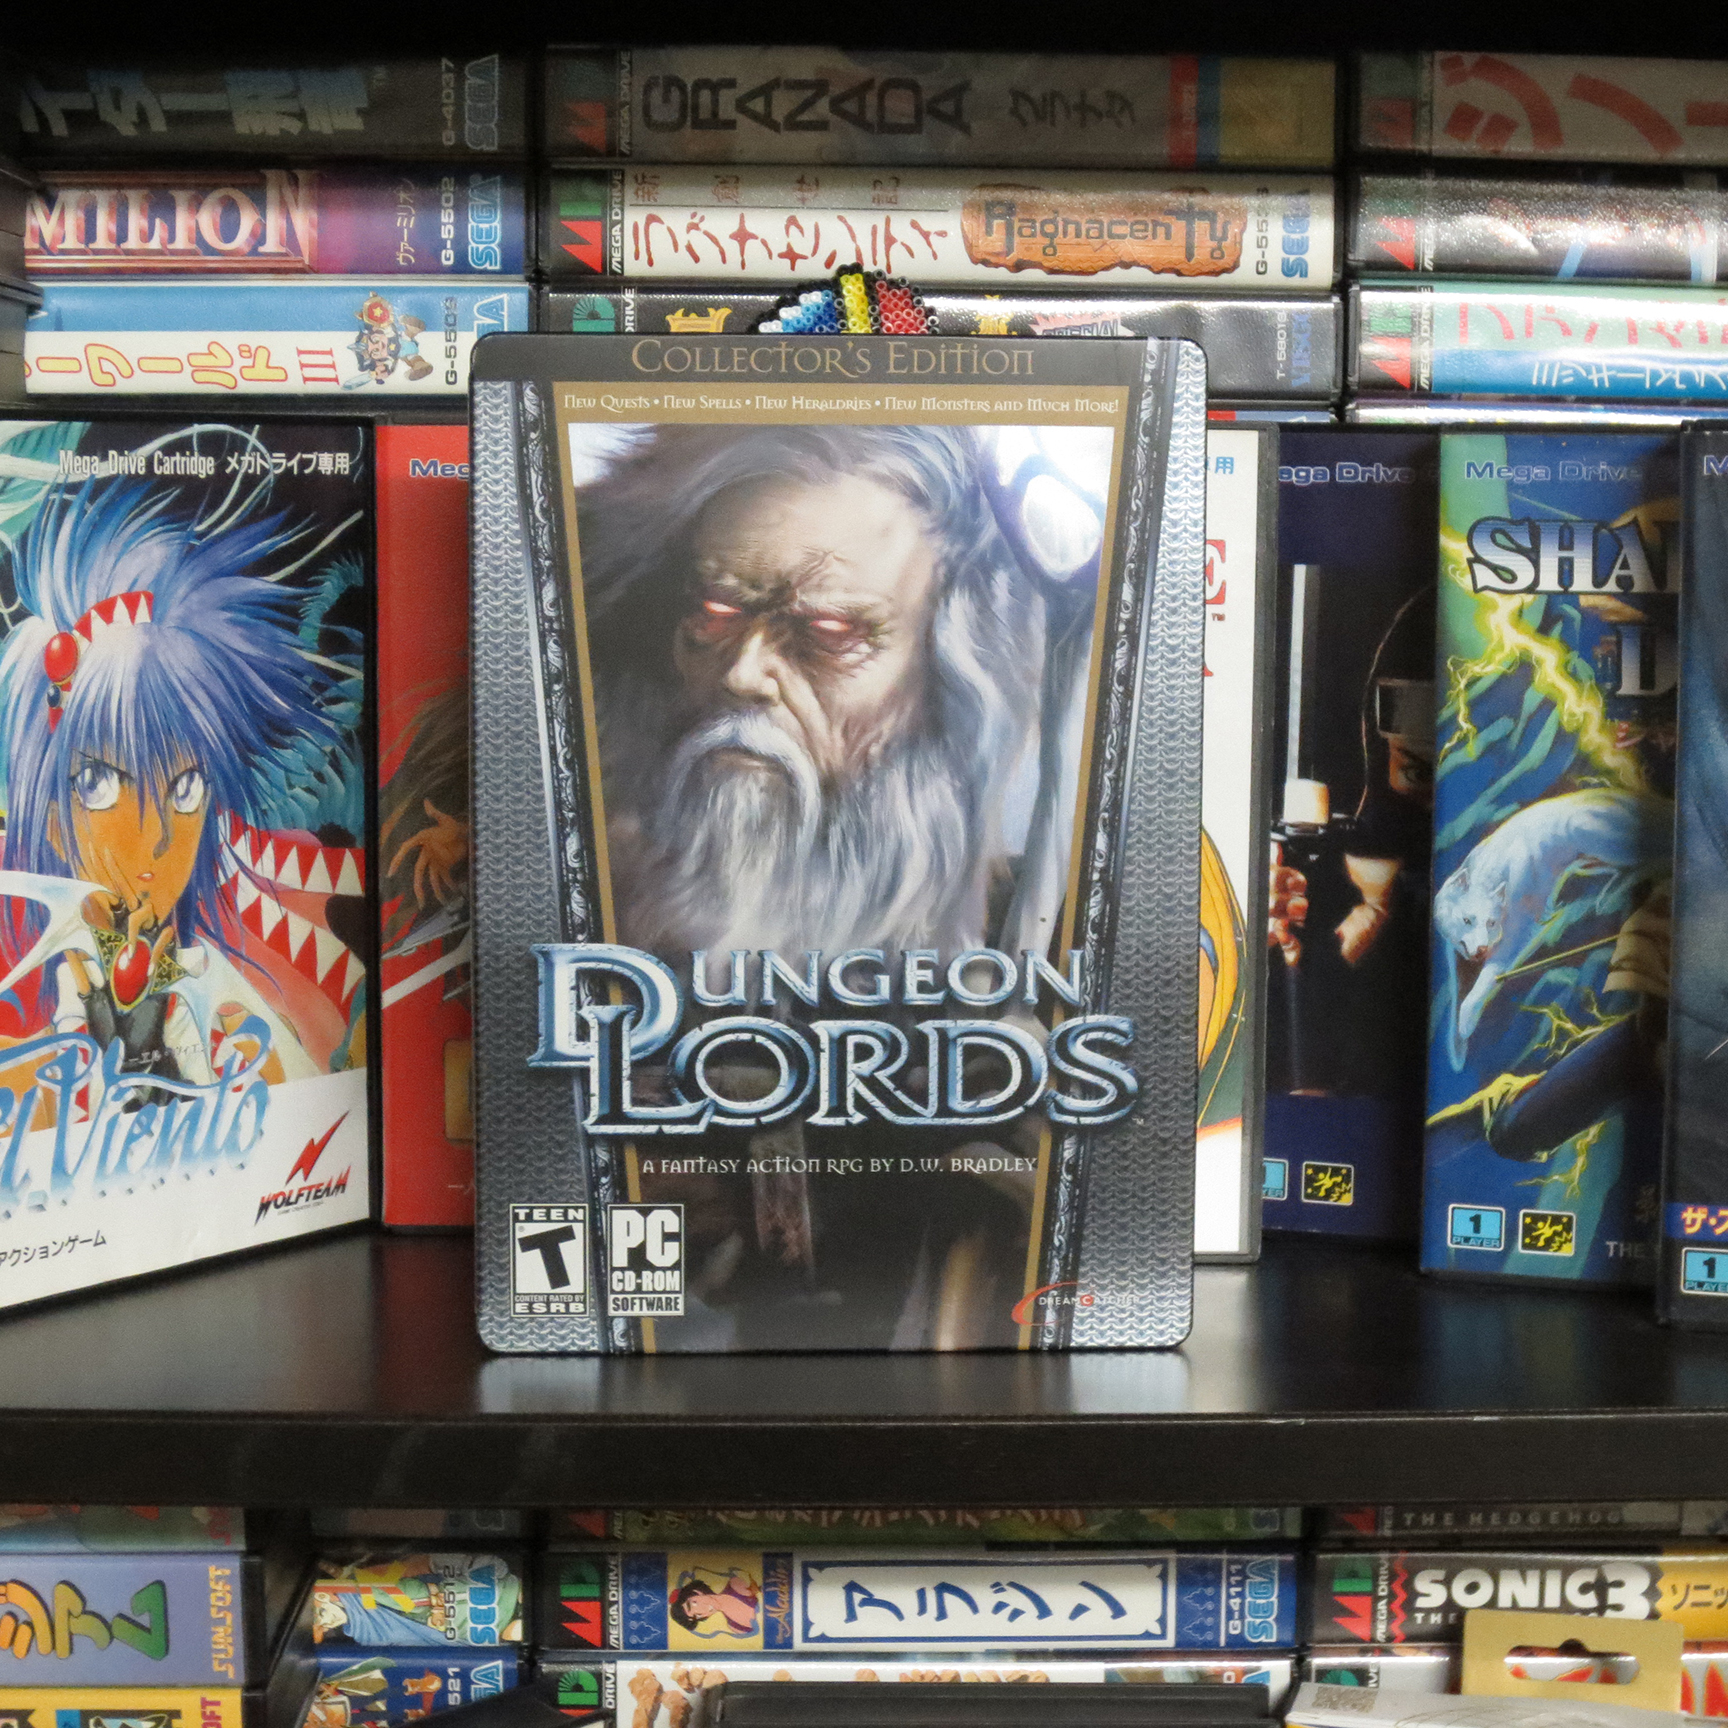
Even though I didn’t buy anything that does not mean I went home empty handed! Thanks to Nintendo Joe I came home with three Super Nintendo games and Dungeon Lords for the PC. Haven’t heard of Dungeon Lords?! If you’re OK with old games that look old but are still awesome check out Dungeon Lords. I’m sure Nintendo Joe only gave it up because he’s all Mac now and does not have a PC. …but I still love him anyways.
Courtesy of Nintendo Joe. For my Nintendo Corner!
Two of these SNES games are ports of SNK Neo Geo games which added a lot more interest for me with my new found Neo Geo collecting. Nintendo Joe could have easily sold these for $10 each but instead he sent them my way. Thank you! *Update: After becoming more particular about what I collect I ended up giving these back to Nintendo Joe.
Speaking of new games; just before the show I picked up some Master System games from Flavio. He gave me a great deal on a stack of games. It really pays off having friends into the same stuff you are.
For this Game Swap I decided to try something out. Something to get the SegaDude out there! And ingrain myself deep into pop-culture!!
In most of my games I stuck in a business card that I made up using the artwork made for me by EvilKalman. I also scattered these cards on the table top so people could just grab one if they wanted to. The idea was to see if I could find anyone who might want to check out what I have going on here 😀
SegaDude Business Cards!
Before I left for the Game Swap there were 96 of you wonderful people subscribed to my blog. And now a week after handing out my cards at a jam-packed video game venue?!… there are still 96. A quick calculation tells me that is a net gain of zero (0). I bought 250 cards (still have most of them) for $70. Well, whatever, I still think they are cool and I believe Nintendo Joe is a wee bit jealous so they are worth every penny. 😀
When we drove home the car felt just as packed as when we went there. Of maybe ten boxes of stuff 8 were coming home again. I’m done with my doubles and I want them gone! So I start putting them on Kijiji (Classifieds) and that same day I was able to sell my boxed SONY PSP for $80 and the next morning I had sold all of my remaining 66 Japanese Sega Mega Drive games. I was willing to sell them individually but I also offered the entire lot of games for $280. And poof! they were gone. Someone just getting back into the Sega Genesis bought them all. I got rid of them and he got all those games for less than $4.25 each. That’s a win-win in my book.
Don’t forget about Dungeon Lords. It’s an excellent open world action RPG. It’s also good and hard!
After being teased with some very pretty Project Y screen shots we can all now enjoy a teaser video for Project Y.
This work in progress (WIP) video gives us a very good idea of what Project Y will be like. And even though this is very early footage it is looking fantastic.
One of the first thoughts that struck me while watching was that instantly Project Y feels like it has it’s own identity. I did not feel like I was watching just another retro Beat’em-Up. Of course there are many similar elements from the genre but there is a lot that looks unique.
There are several game mechanics that really stood out in this short clip. Of course you can interact with the baddies in this game. You’re going to be punching, kicking and tossing them all over the place; but you can also interact with the other playable characters. Right at the end we see Alex grab Tug from behind and start to push him off-screen (don’t quote me on those character names).
I also noticed Tug using a fire extinguisher to spray and freeze an enemy in his tracks.
Each of the playable characters seem to be able to get some kind of power-up. I’m sure earning and saving these for key moments will help add extra strategy to the game.
And it looks like the baddies can dish it out too. I’m not sure how it happened but I saw a dude electrocute Alex. What was cool is that another baddie got caught in the cross-fire and also got zapped along with Alex. I can’t help but feel that this kind of thing will make multiple play-throughs unique experiences with such variables in the mix.
Speaking of unique, did you notice the butt-slap taunt at about 30 seconds into the video?
Very cheeky!!
I personally feel the graphics look amazing! The environments feel ‘meaty’. They are full of stuff and the character sprites are very large for a Genesis/Mega Drive game. Making it look more like an arcade game from the 90’s rather than a 16-bit home game.
The music is down right intense. I love the pace and mood that it slaps on top of the visuals. Music is an important part of my gaming experience and Project Y has gotten some serious treatment in this department.
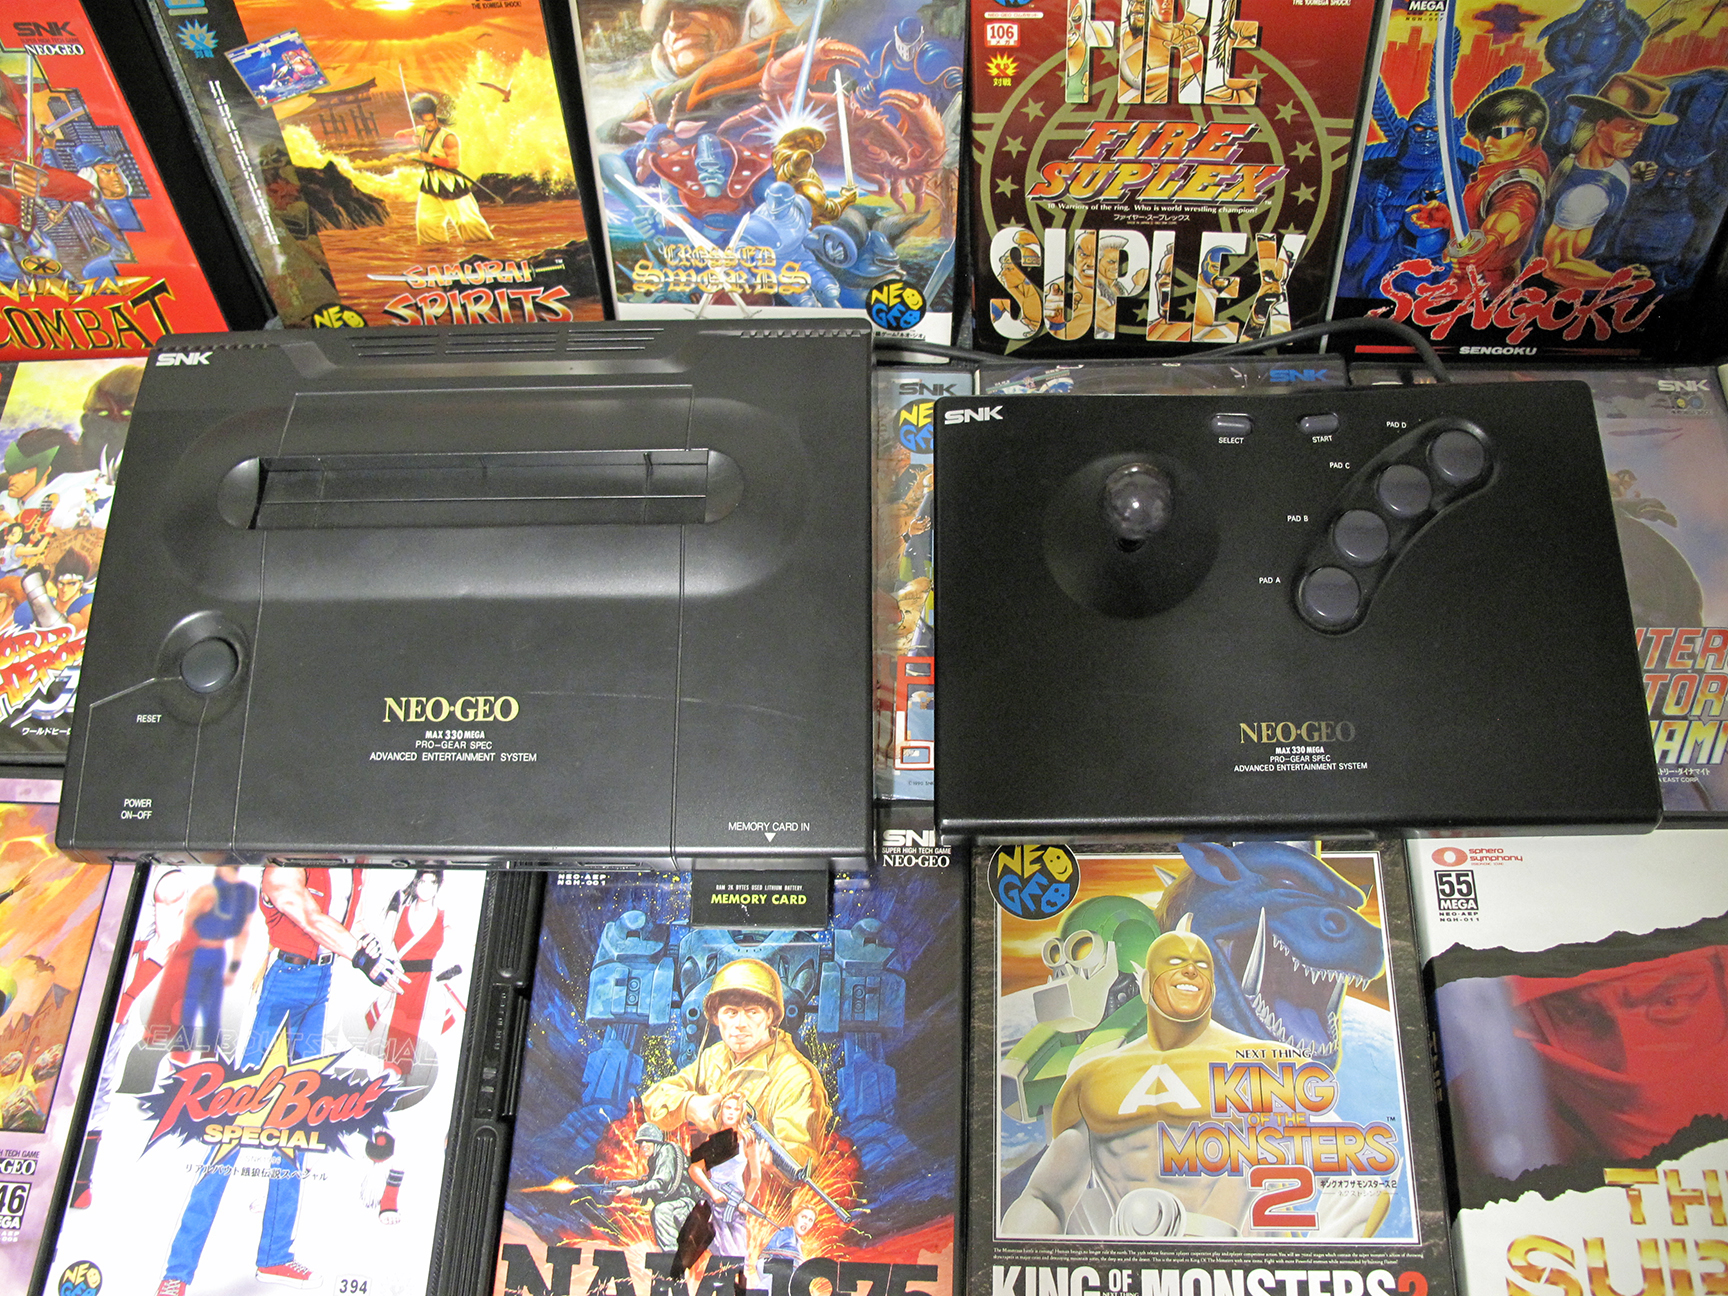
For a good long while now I’ve found a very nice distraction in playing and collection games for the Neo Geo MVS.
**Disclamer** I hope you’re immune to ‘drawn-out’ and boring… because I’m about to get real wordy.
For anyone not familiar with the Neo Geo there are two primary flavors of the original hardware.
Neo Geo MVS stands for Neo Geo Multi Video System (MVS). This is the version found in the arcades (throughout the 90’s mostly) in a classic 225lbs upright cabinet. Many Neo Geo arcade cabinets could support more than one game at a time. Either 2, 4 or 6. Allowing a player to select one of the installed cartridges(games) to play. There is also a version of Neo Geo arcade cabinet that can hold only one game at a time which was instead called Neo Geo System.
My Big Red: Neo Geo MVS 4-Slot Arcade Cabinet
Shortly after the release of the Neo Geo MVS came the Neo Geo AES; which stands for Advanced Entertainment System. This version is the in the form of a classic video game console that plugs into your home television. The hardware and games are identical. The AES will play the exact same games with the same performance as the arcade MVS systems.
This was my Neo Geo AES before I sold it. I still miss it!
However the cartridges for the MVS and the AES are different sizes and are not interchangeable. If you have a Neo Geo MVS you need to buy MVS cartridges and if you have the Neo Geo AES you need to buy AES home cartridges (there are adapters but I wont get into that today).
I decided to switch from collecting AES game to MVS games because MVS carts are so much cheaper. They’re still not cheap but with very few exceptions MVS carts are a good magnitude cheaper than AES carts.
And you can bring the price down a little bit more if you’re willing to purchase nasty beat up carts; which are sometimes referred to as ‘gamer condition’ carts.
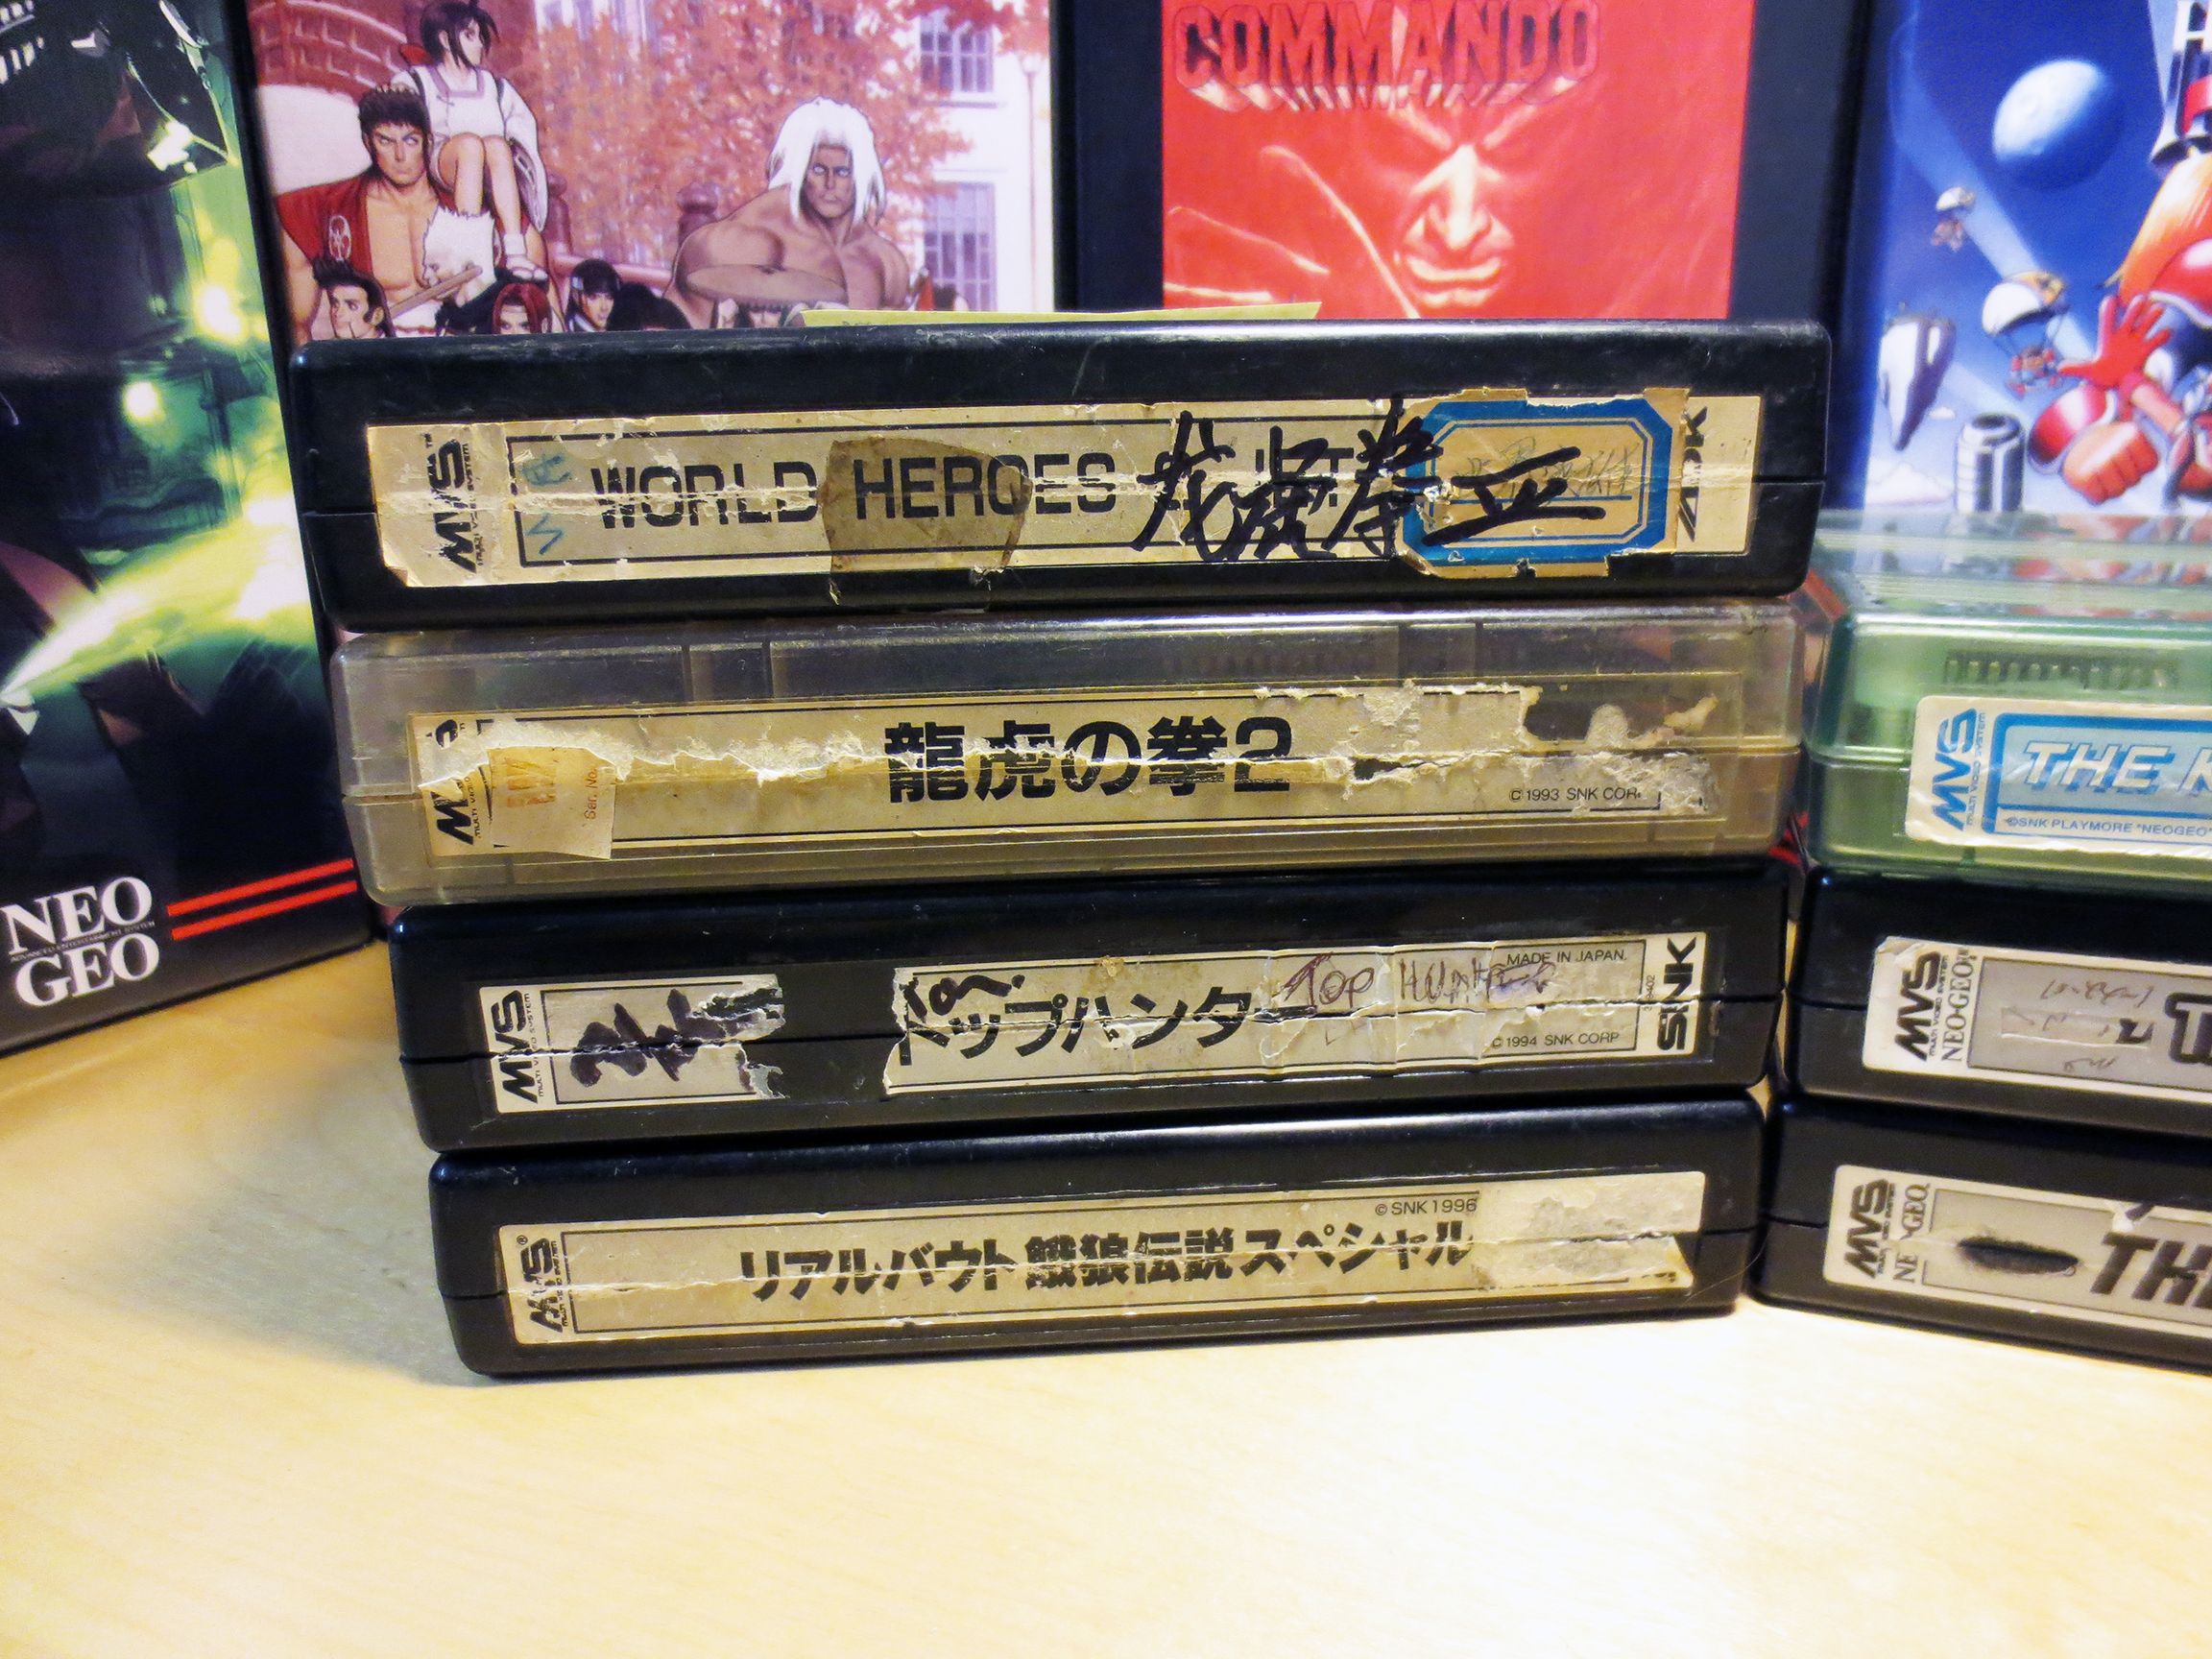
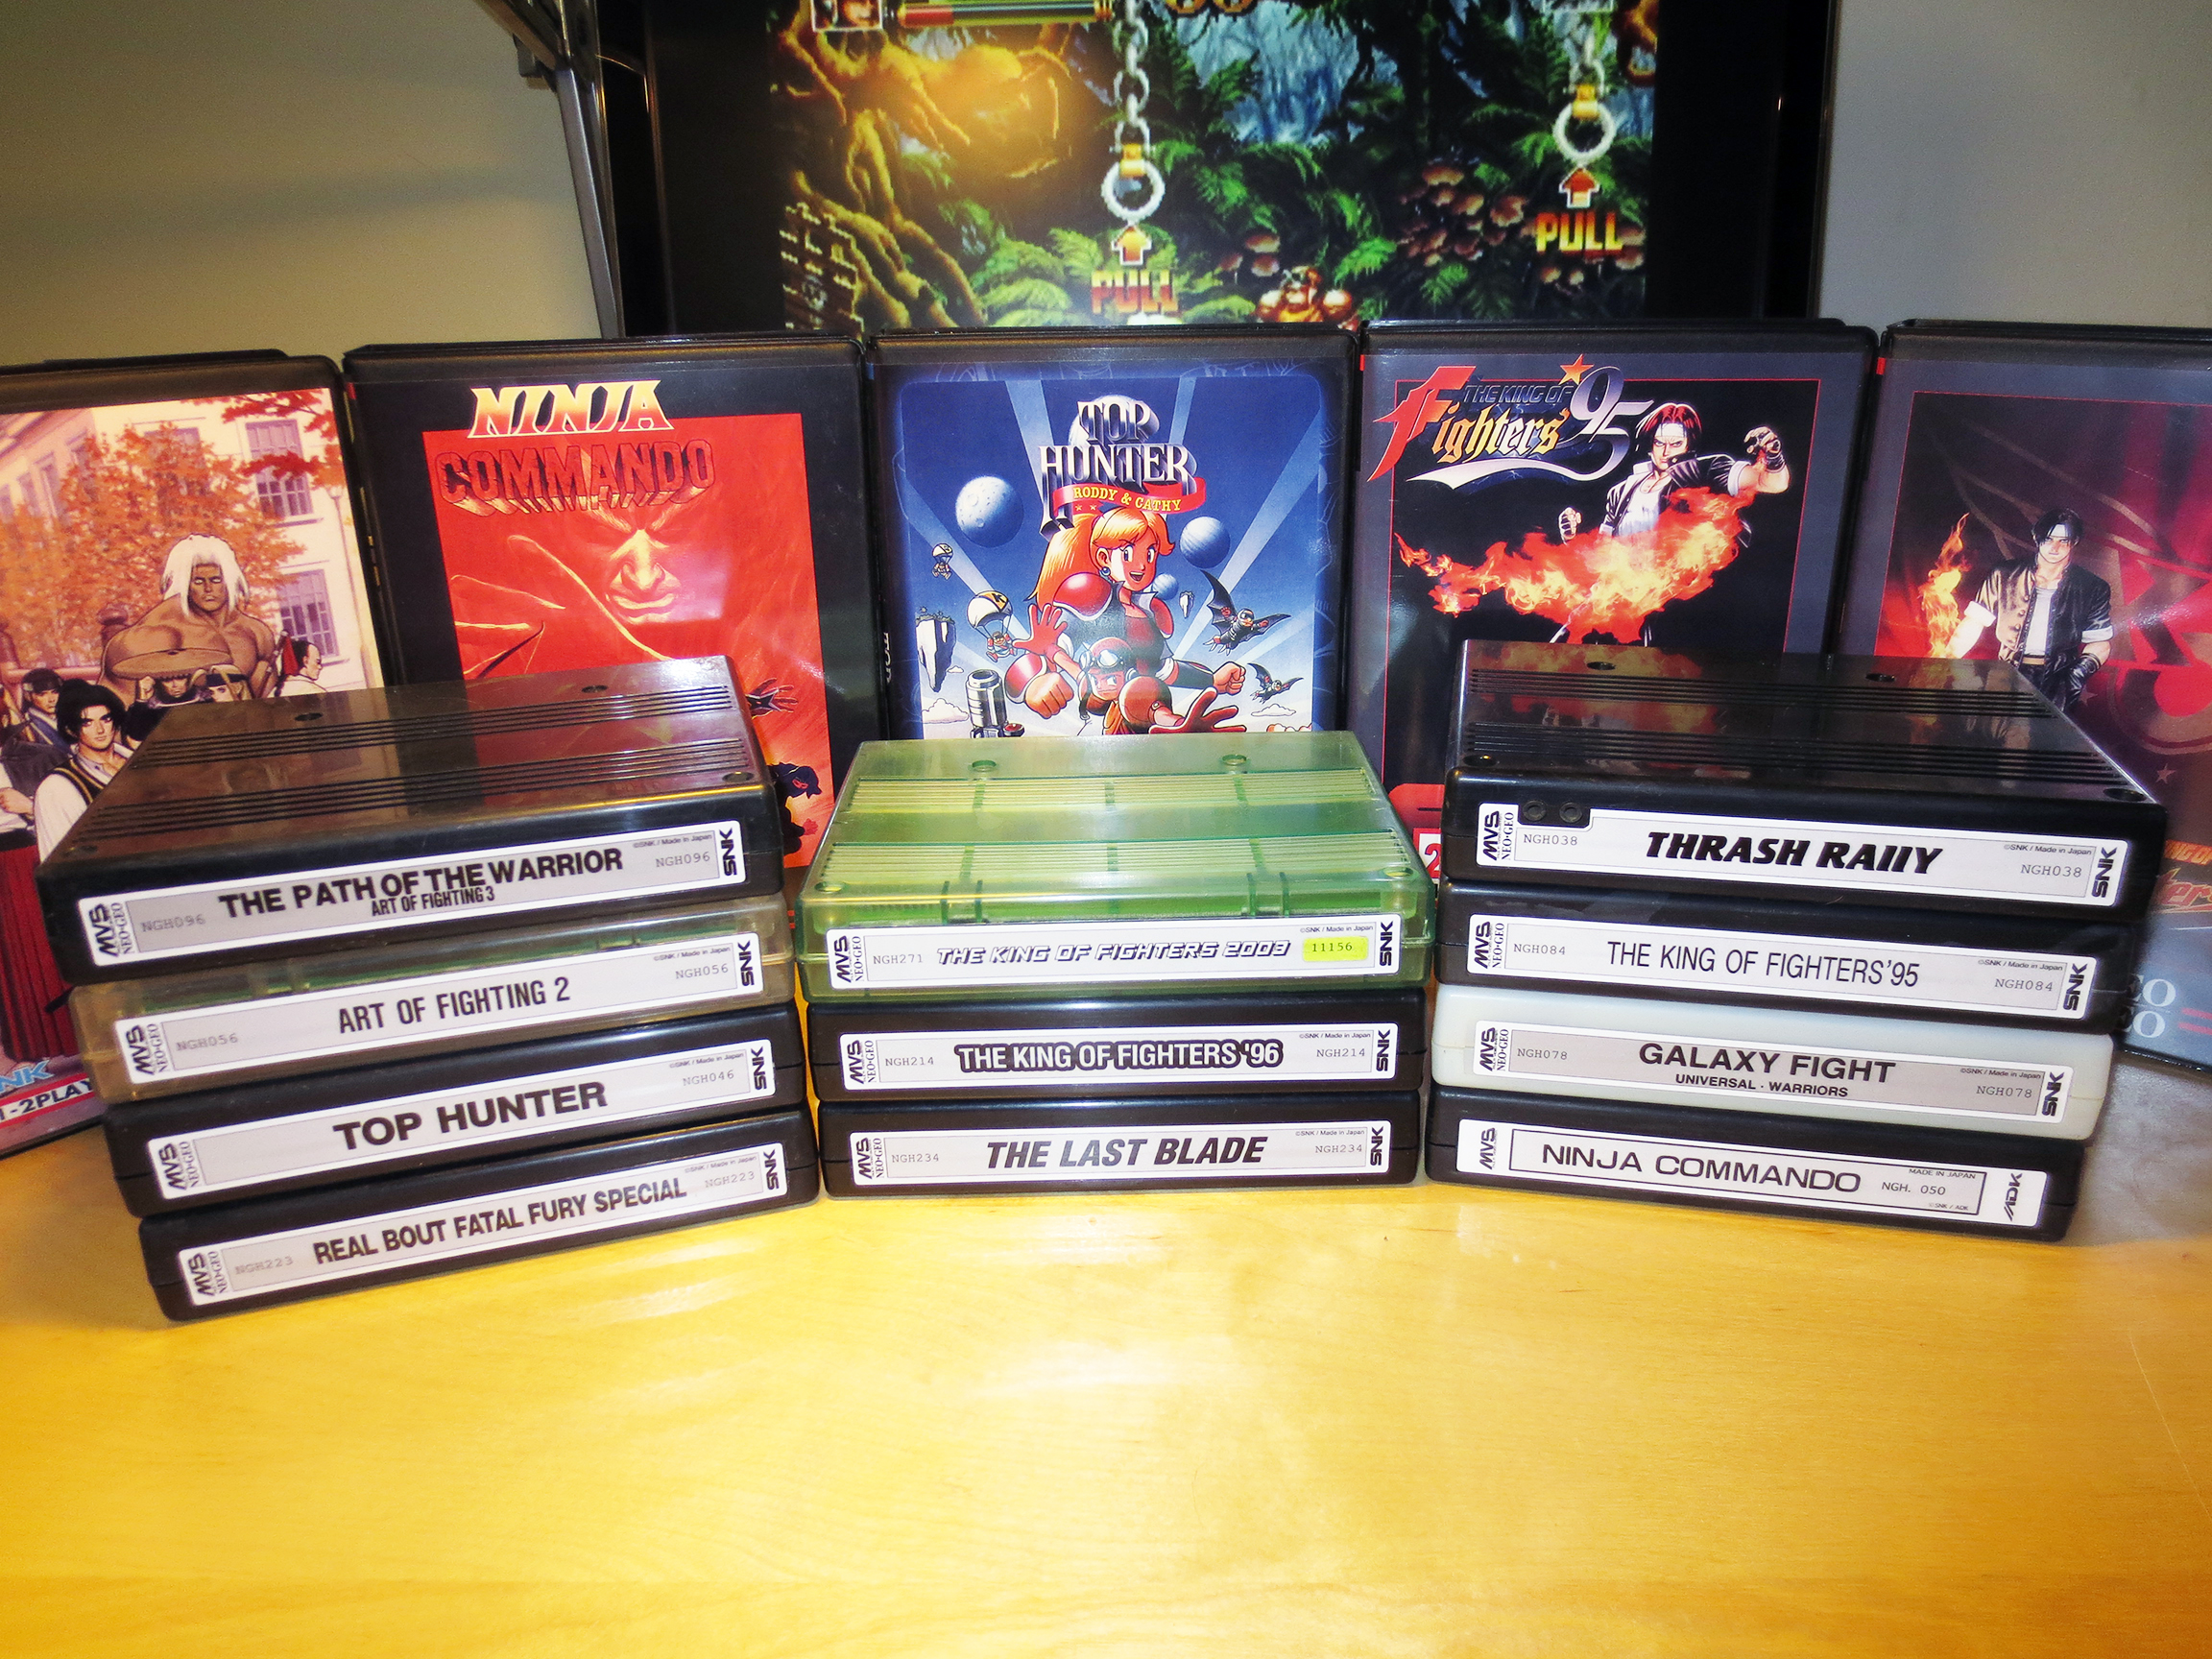
And that is exactly what I do. Check out the image below… NASSSTTTYYY!!
Bonafide Gamer Condition MVS Carts!
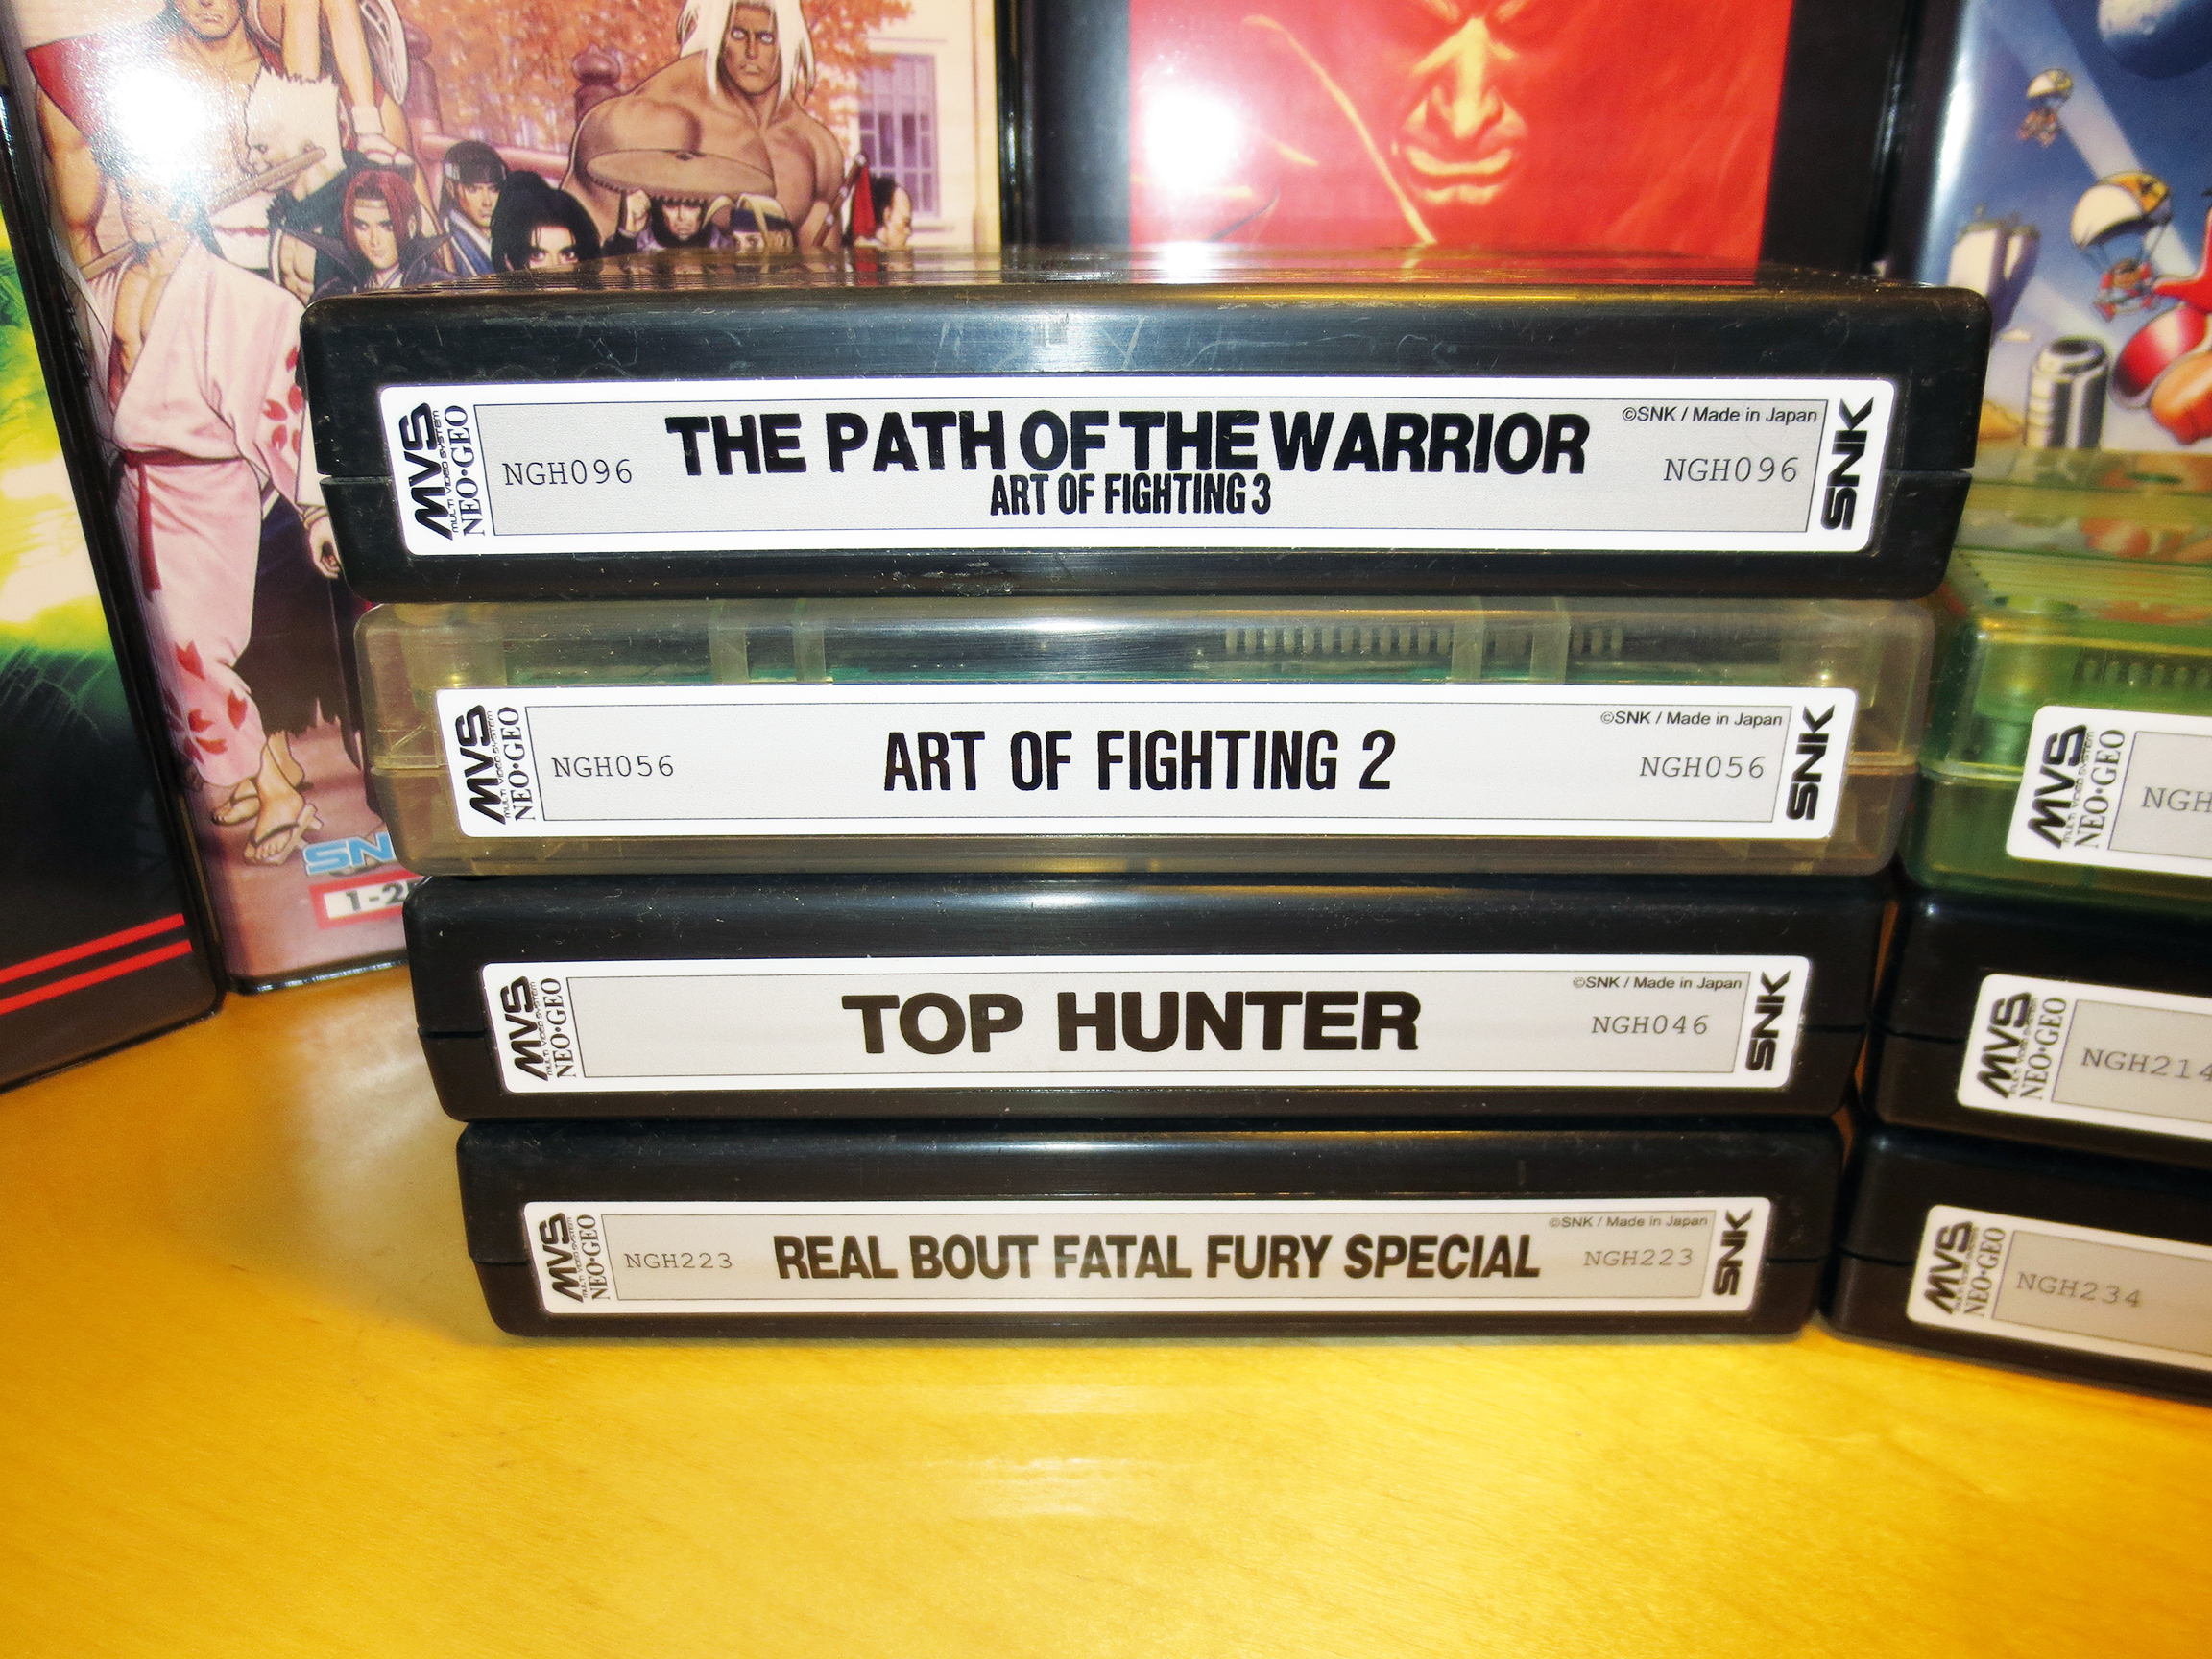
The games work perfectly but the plastics are scratched, marked and dirty. And the labels are in worse shape. Some you can’t even read anymore and Art of Fighting Path of the Warrior is actually labeled incorrectly as World Heroes (Top left). But saving anywhere from $20-$40 USD (or more) per game I feel is worth it.
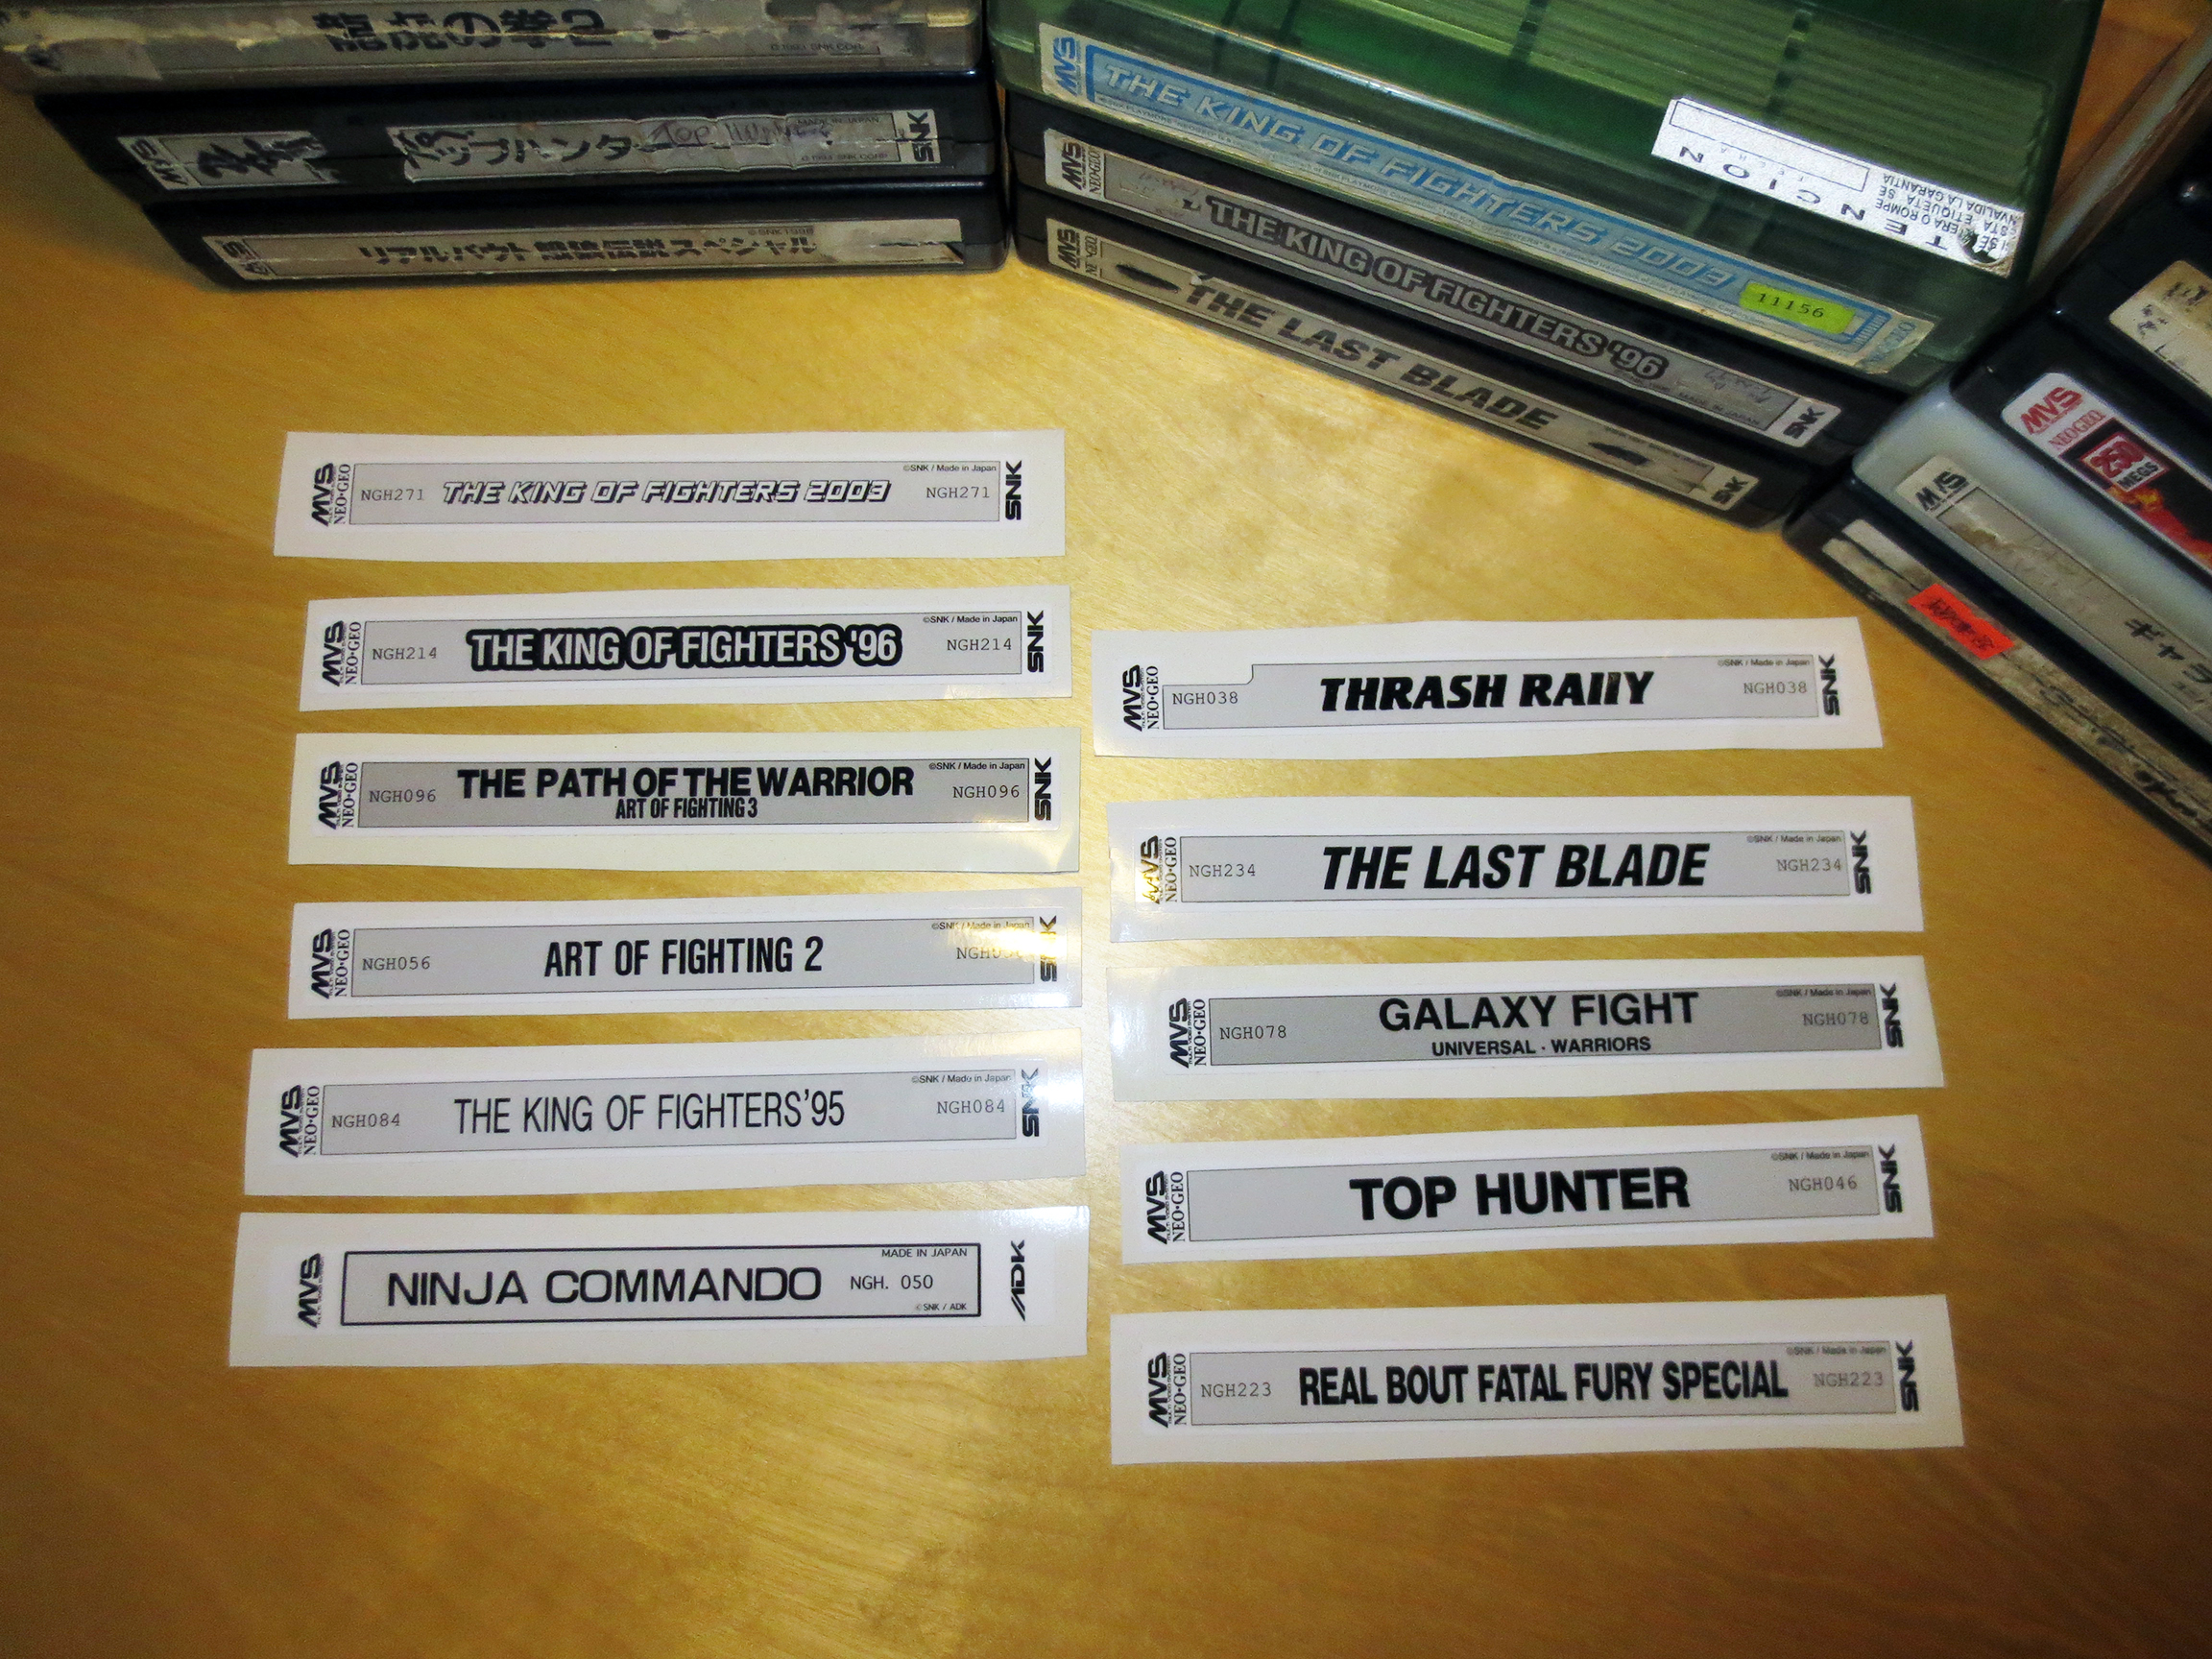
As I continued to collect Neo Geo games I discovered shadowkn55 over on the neo-geo.com forums who sells beautiful reproduction labels for $1 USD each. Not only are these labels brand new but they look just like the original MVS labels. The quality is perfect.
shadowkn55 reproduction labels.
Now I have a way to restore these carts into reasonably good condition.
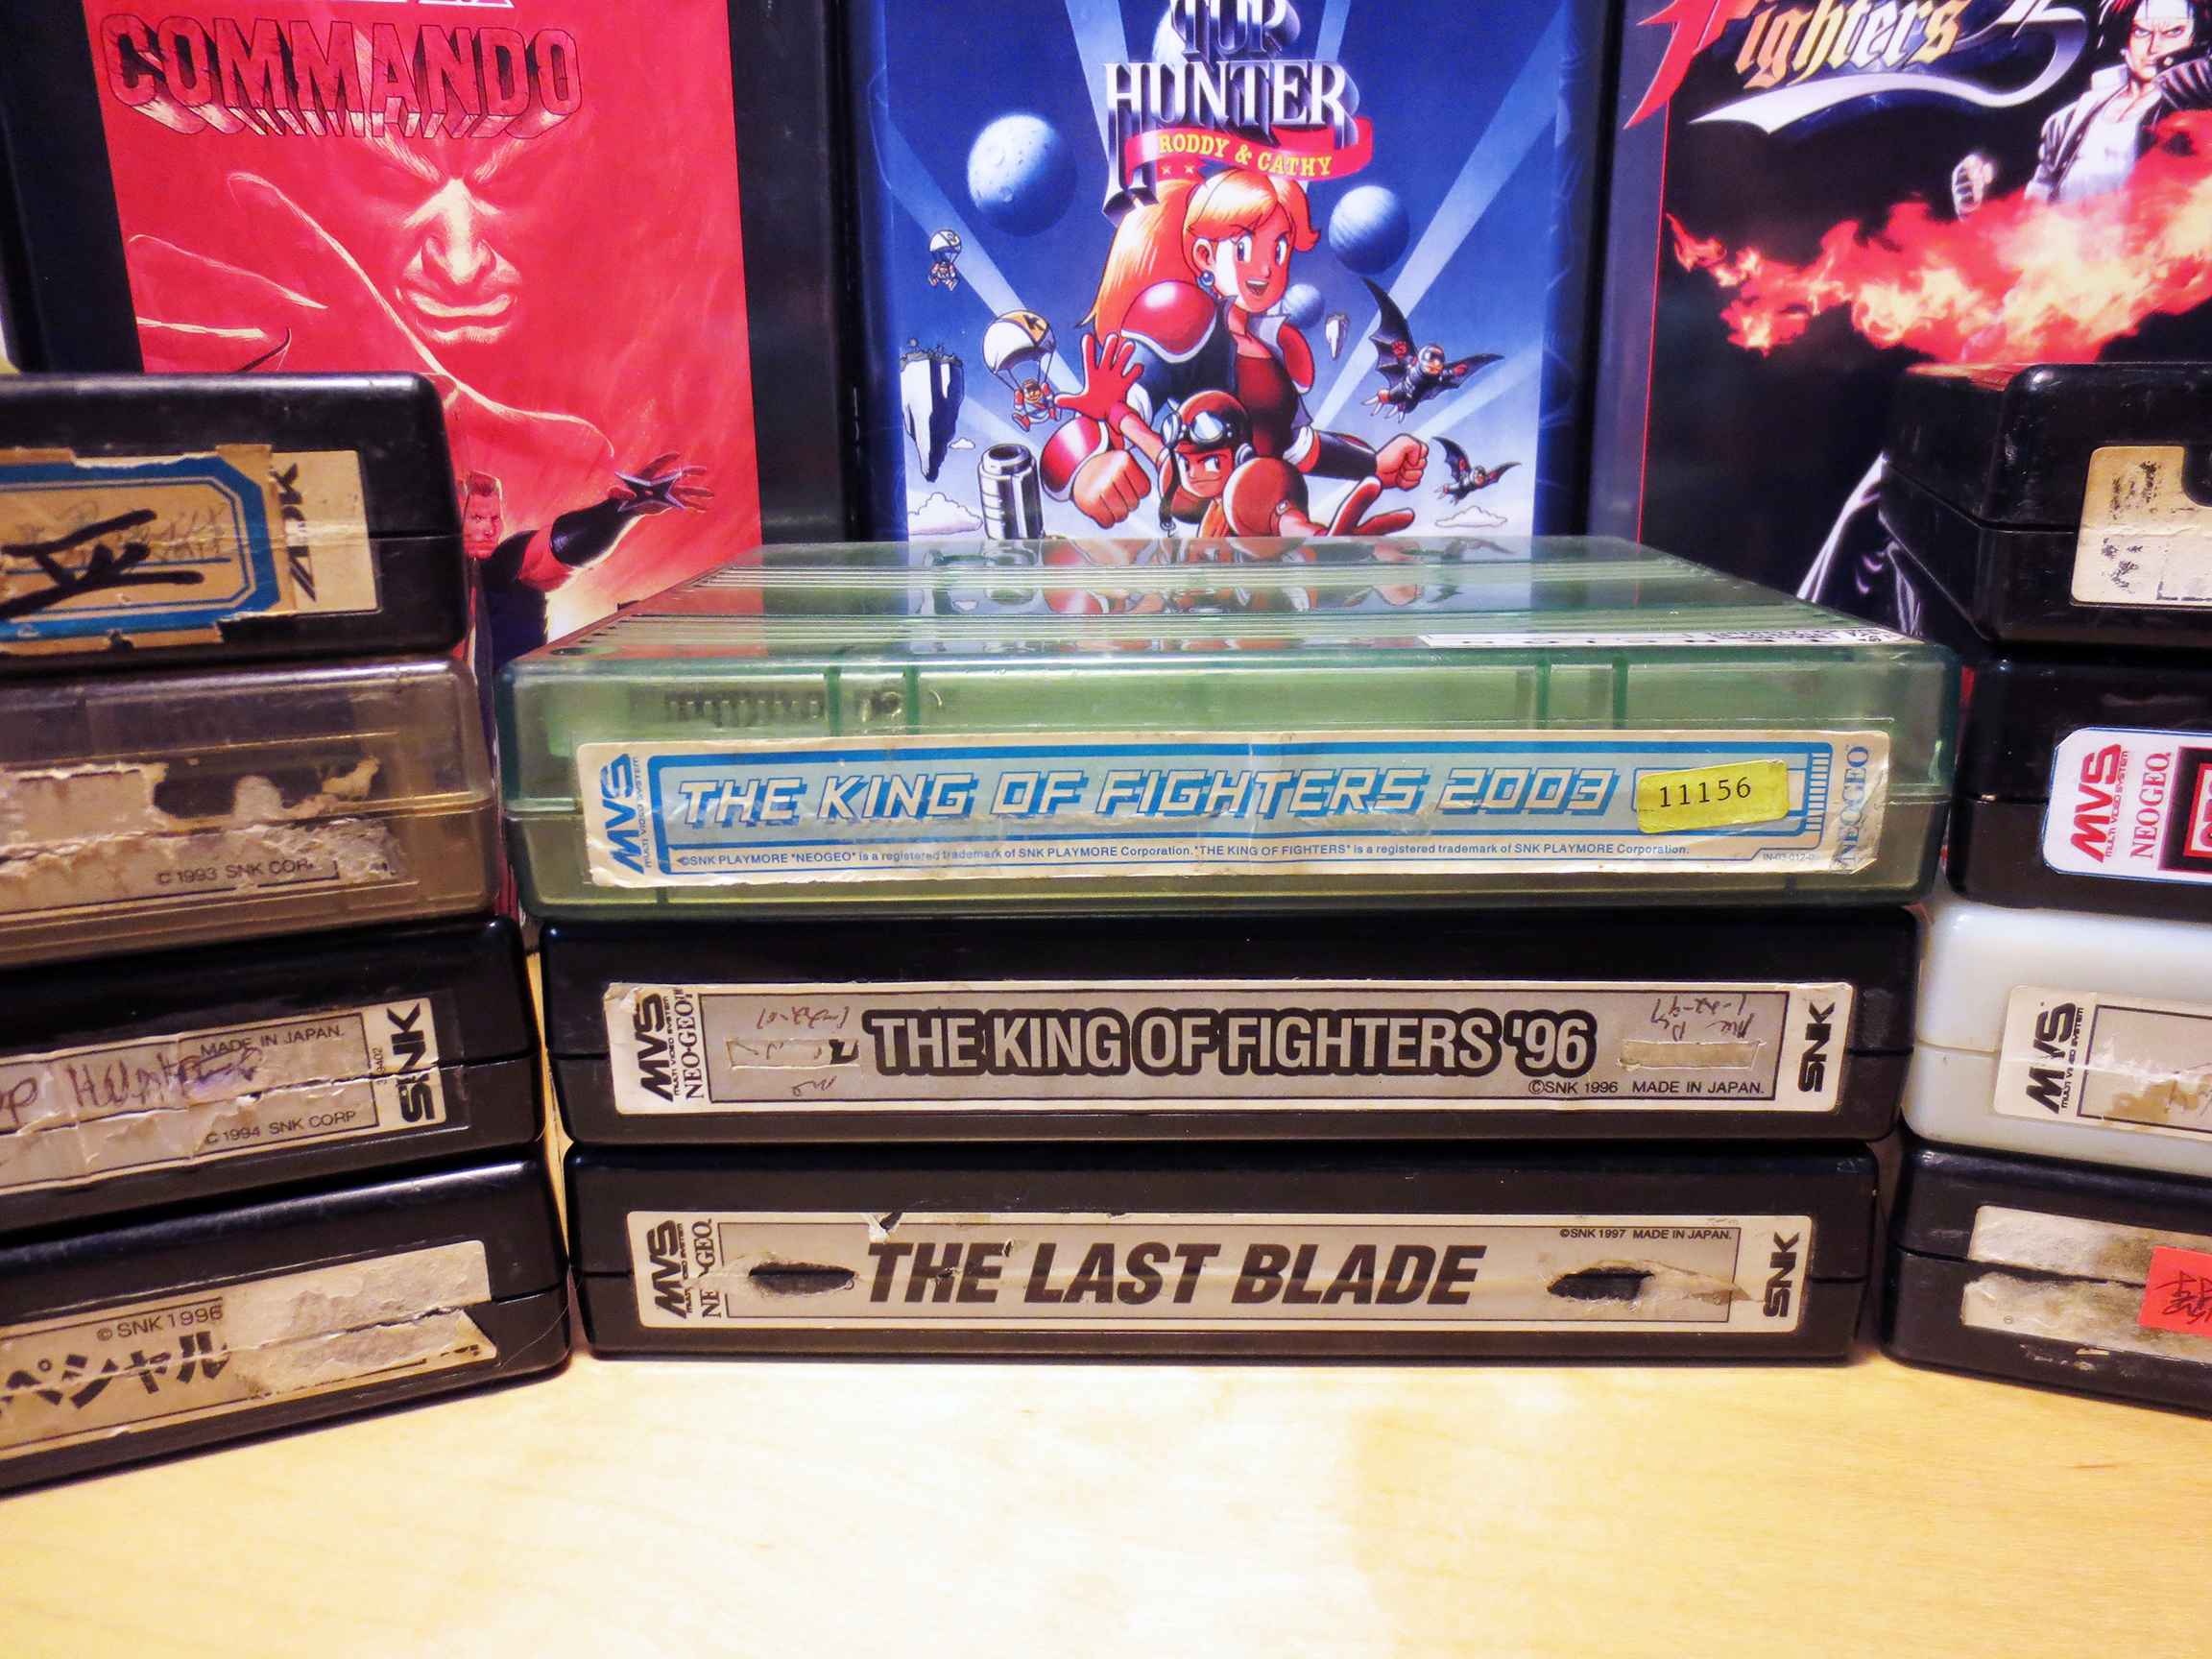
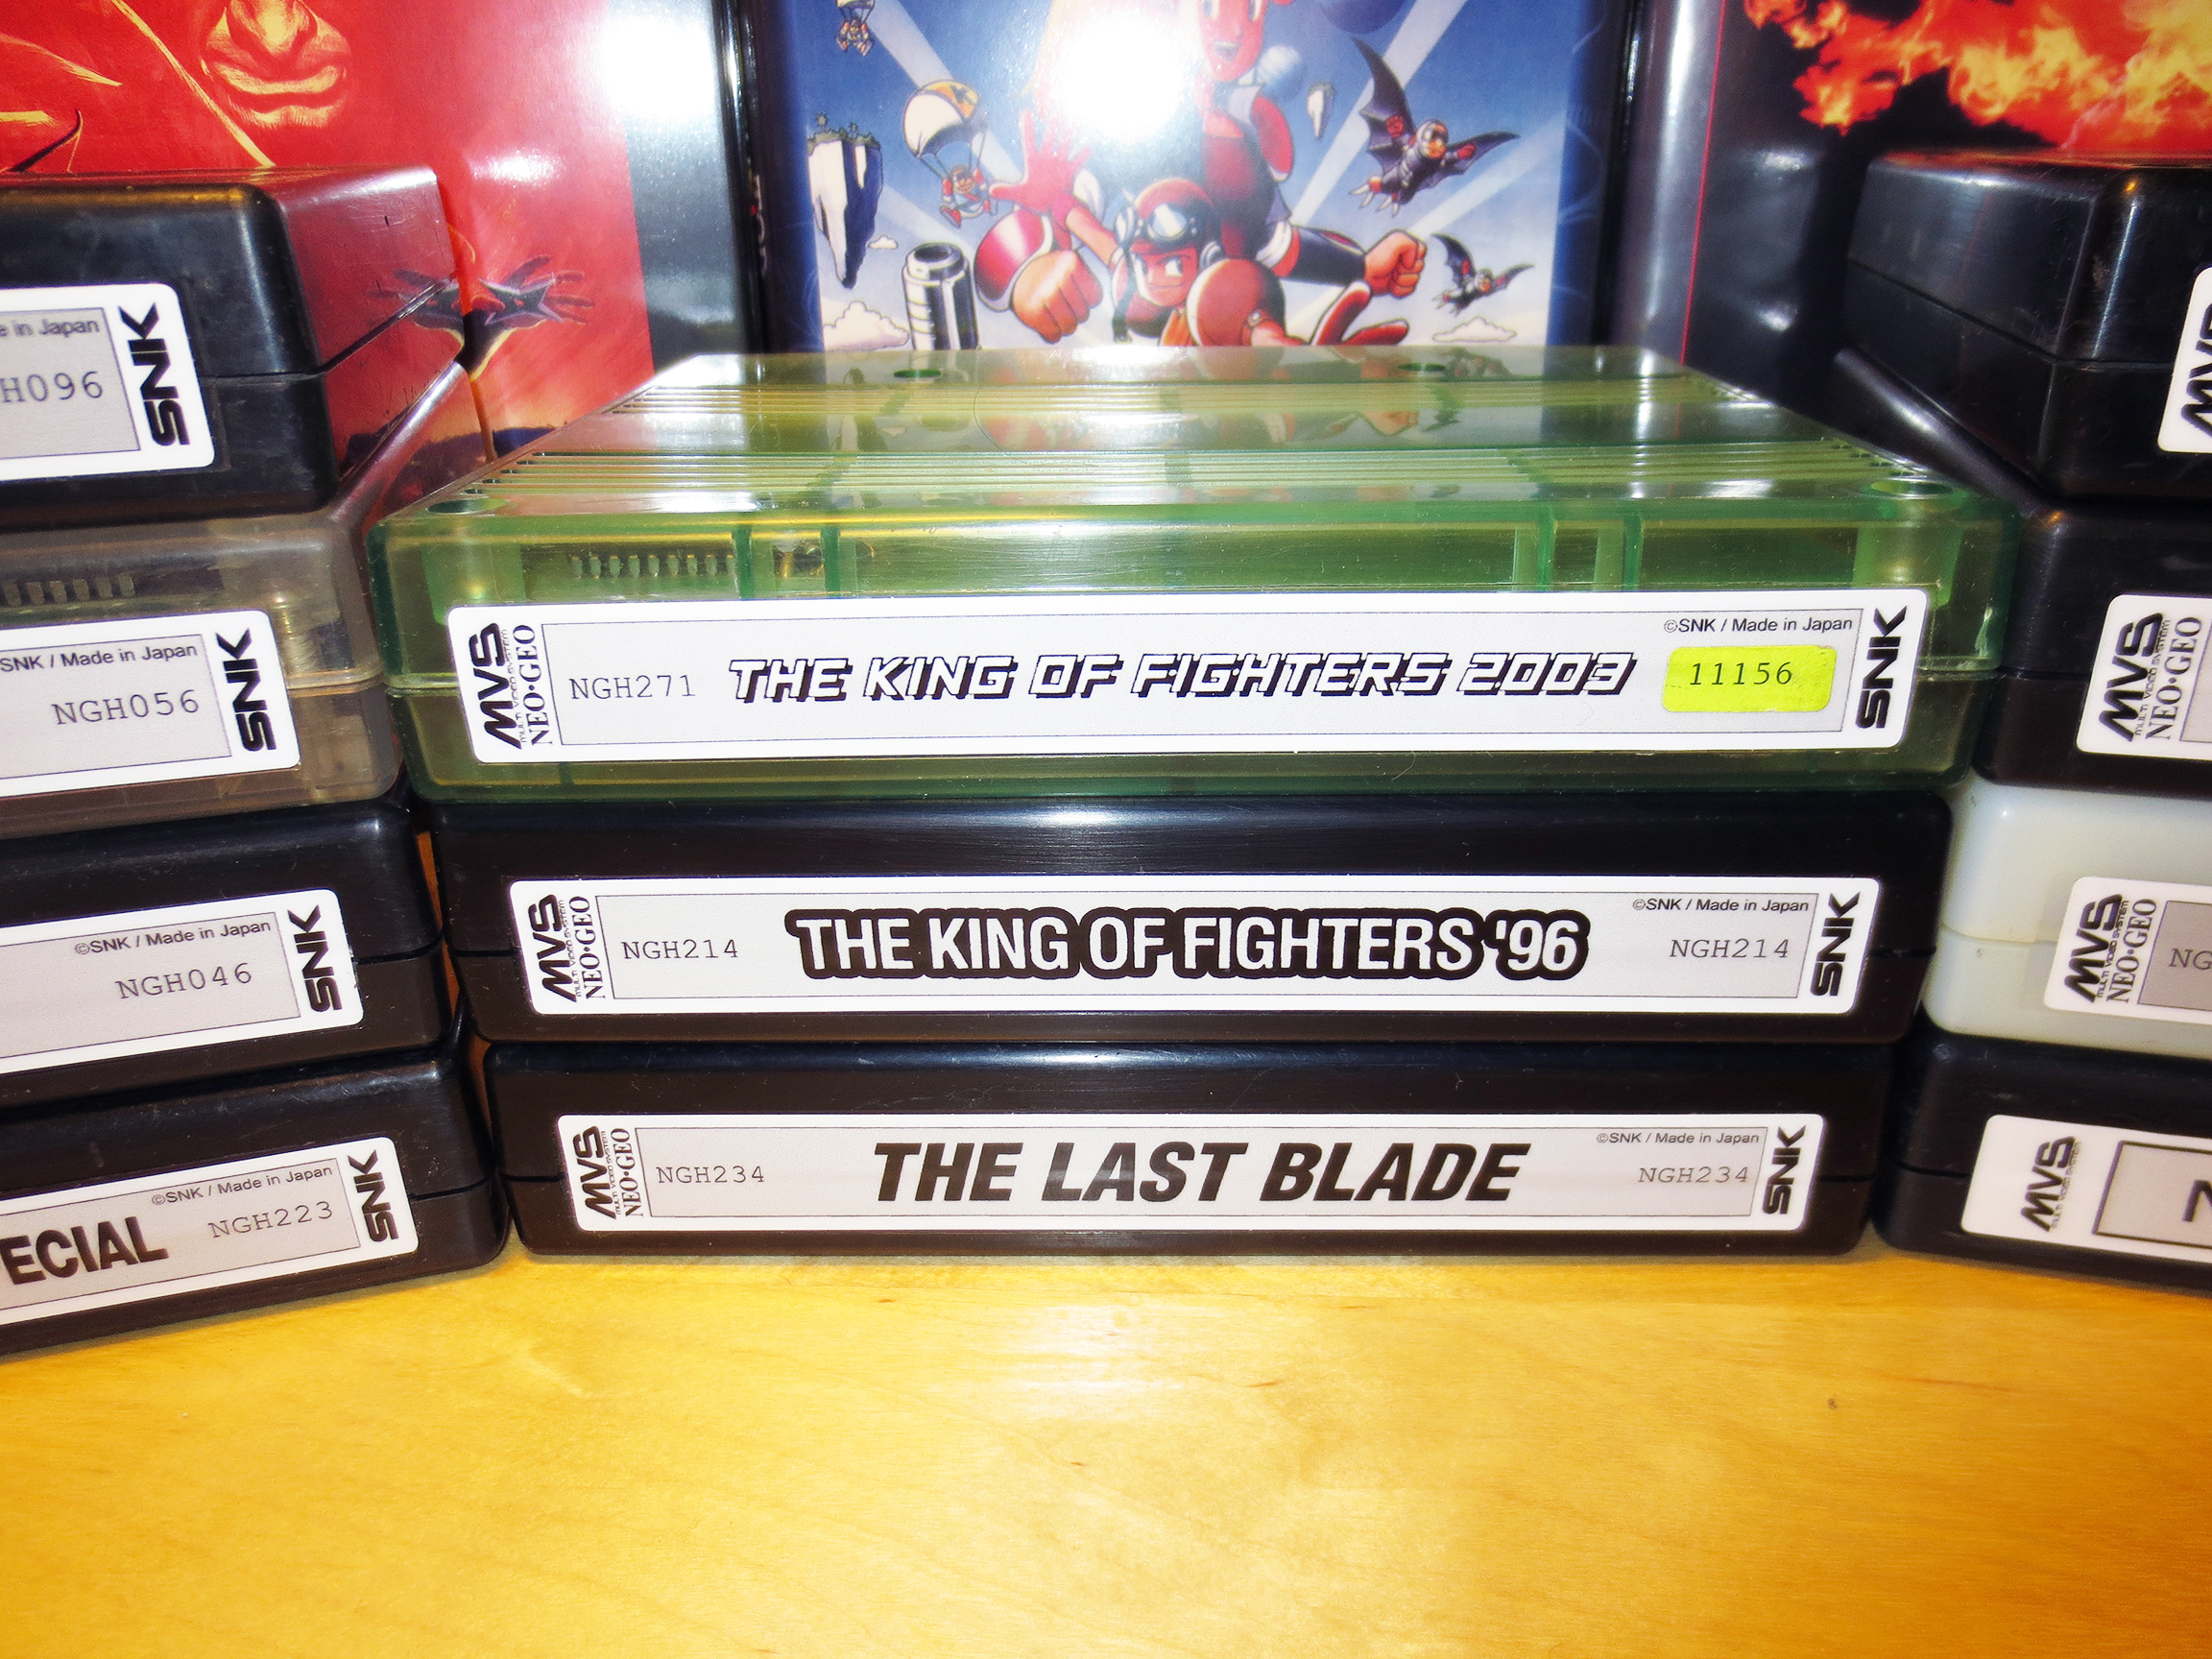
But I do have a few reservations. After spending some time on the neo-geo.com forums I’ve learned that a lot of people really want to keep these carts stock and not change them in any way. I understand this point of view and I feel it has merit. The three games in the middle (The Last Blade, KOF96 and KOF2003) have labels that are not terrible. They’re not good but they’re mostly whole and I can still read them easily.
Should they have been replaced or should I have left them alone?
As it turns out I did feel it was better to replace them. And I think they are looking very nice. But this is something I keep in mind when I buy new labels. I want to be sure the cart really needs a replacement. Because I would prefer to have an original label if possible.
It took a lot of effort to remove most of the old labels. I must have spent 10 minutes scratching at each one with my thumb nail. Once the paper was mostly gone I found that rubbing a little bit of WD-40 where the label was did a great job at removing the left over residue.
Replacement Reproduction labels by shadowkn55.
Close up of New Labels.
**As it turns out the King of the Fighters 2003 is actually a bootleg version and not authentic. Thanks to a fellow gamer who commented below about this. I’ve since sold this boot for $25 and I got myself an authentic version to replace it.**
I think they look great and I’m very happy I did this. For this selection of games only one had a serial number on the cart. And I saved that challenge for last.
You can see that The King of the Fighters 2003 (Top Center) had a small yellow sticker on the original label with it’s serial number. Normally serial numbers are a part of the label just like the title but SNK was very inconsistent and you’ll see them doing many different things with their carts.
This time it worked out very well for me. I was able to use a blow drier to heat and cleanly remove the yellow serial number sticker and apply it to the reproduction label. This allowed me to preserve the serial number instead of losing it. *I wish I had thought of using the blow dryer sooner on every label and not just this serial number sticker. **And it’s a bootleg… ah, wasted effort!**
Not all Neo Geo MVS carts had a serial number but if they do it will only ever appear on the cart label and the original cardboard box that it came in.
Click here for an example of a complete MVS kit with matching serial numbers on both the cart label and on the box label.
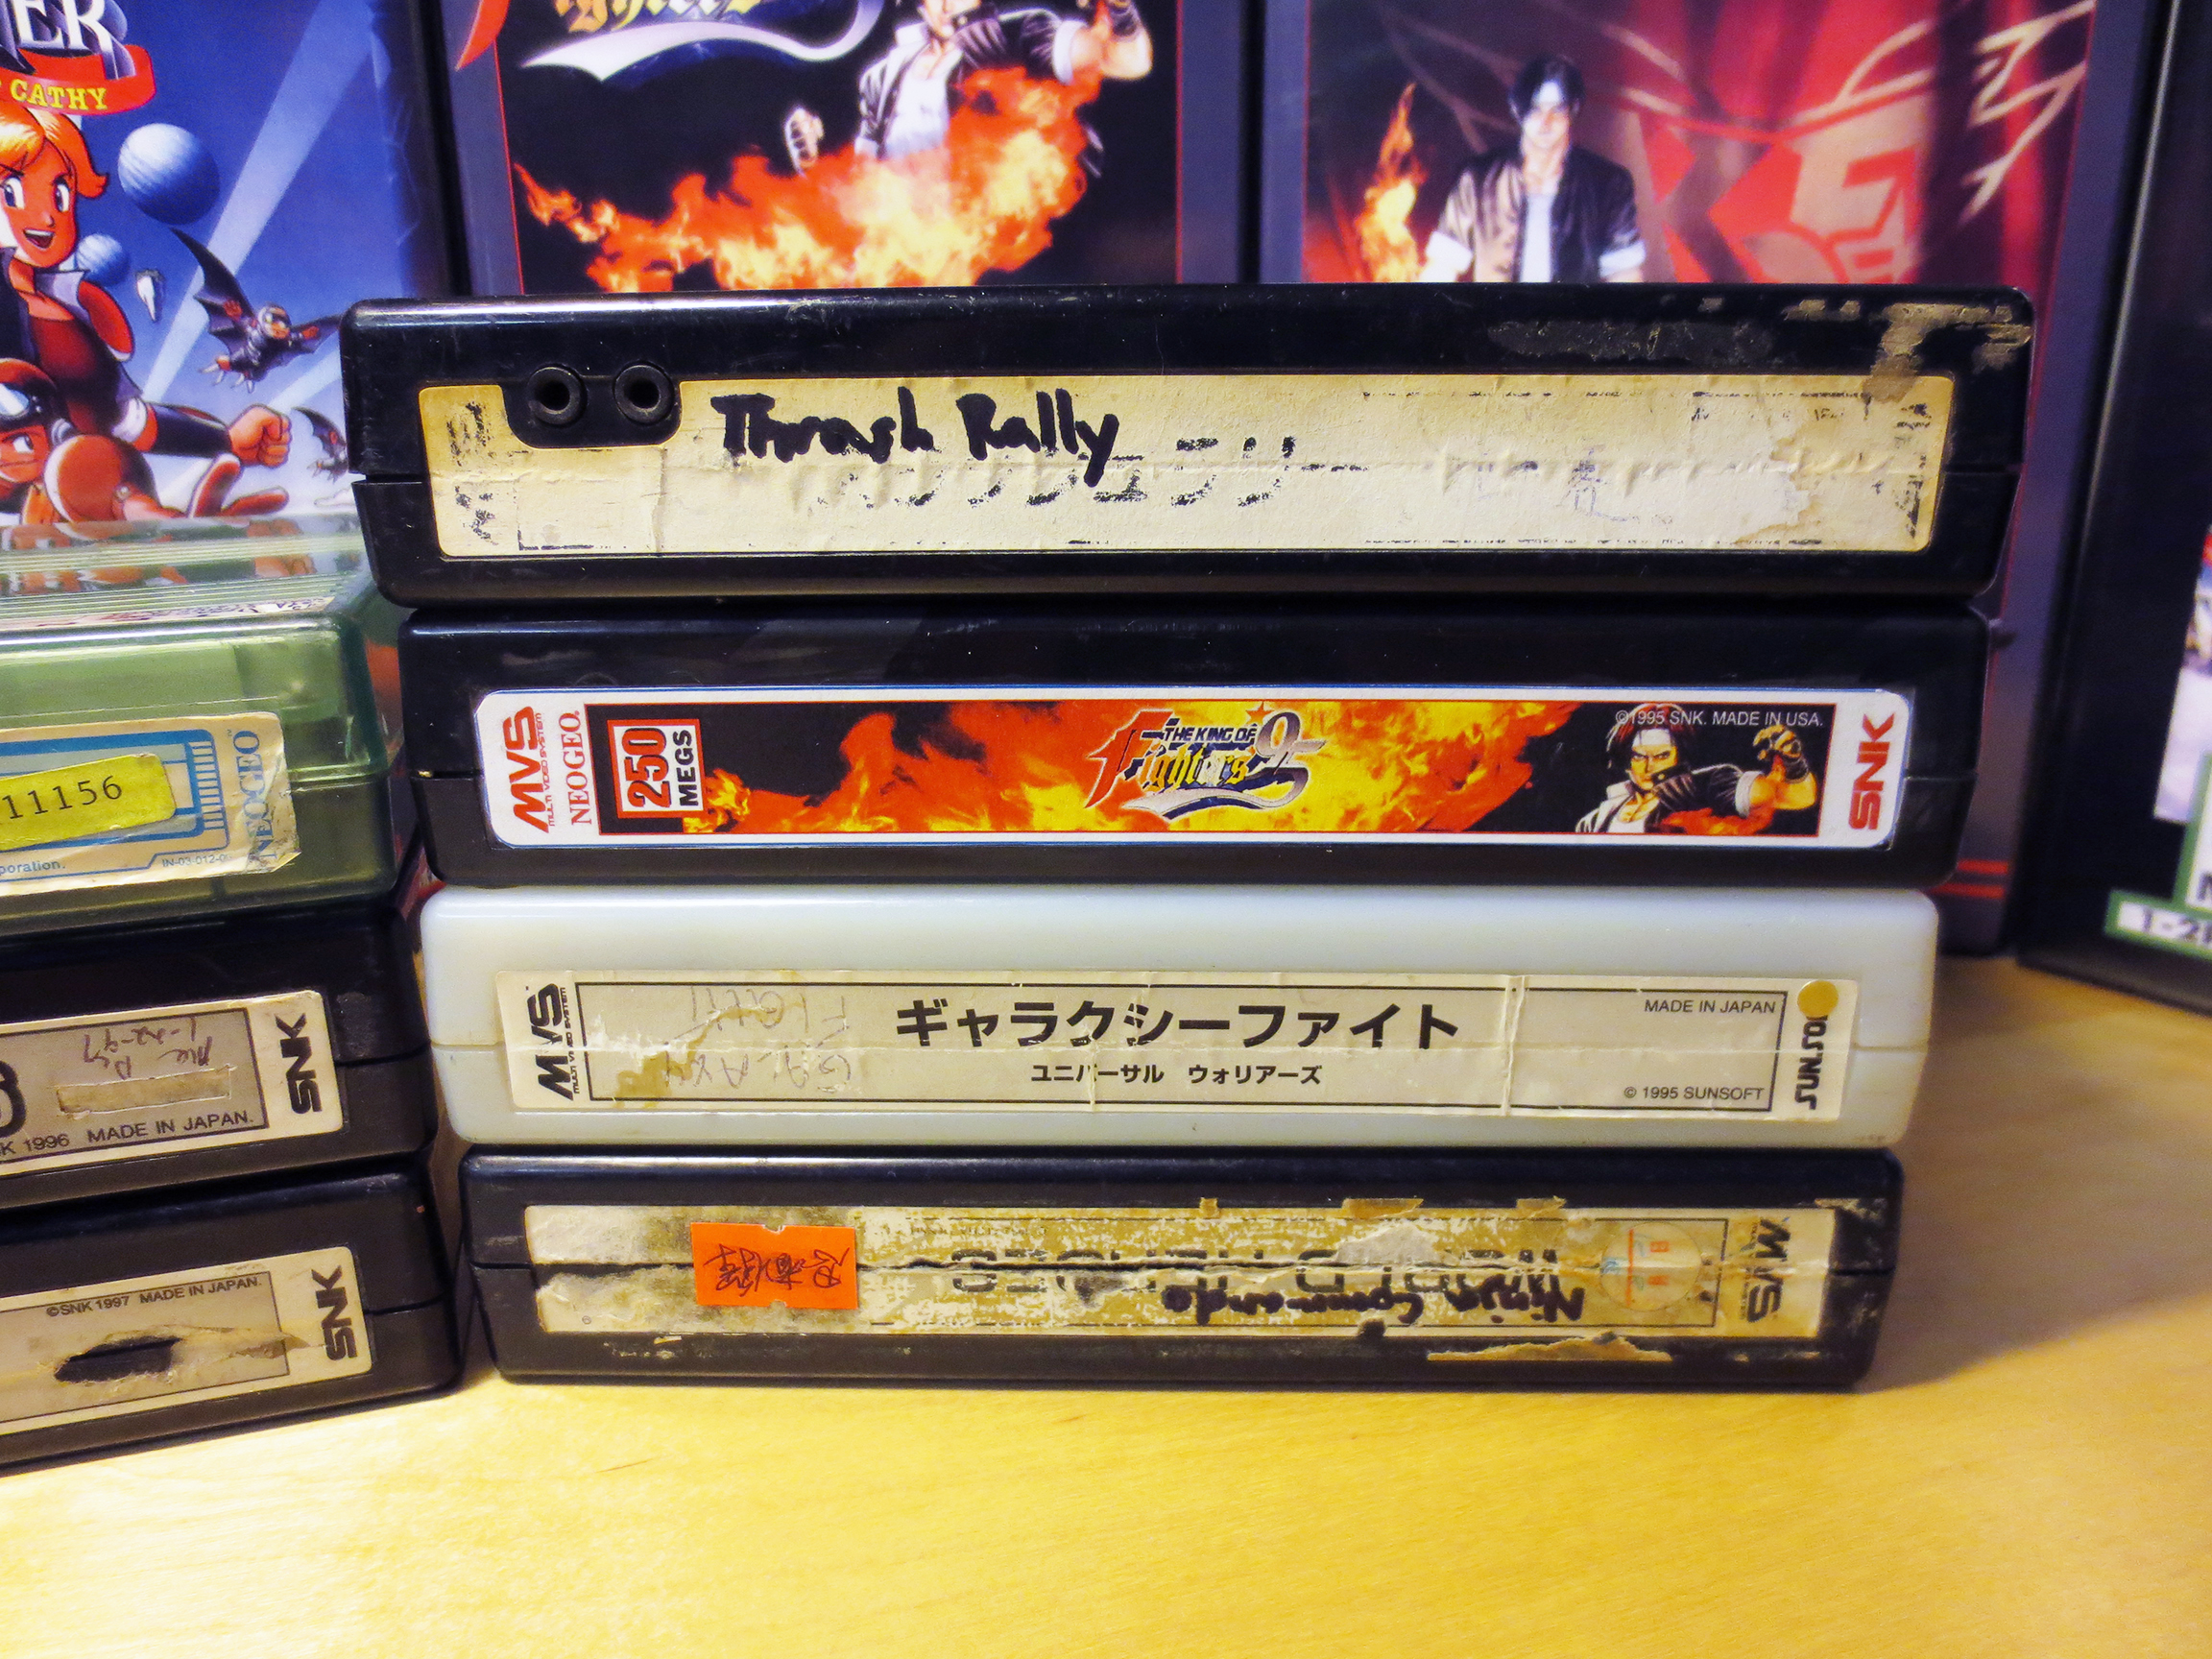
SNK also used many different colored carts for their games. Not only will you find color changes from title to title but it’s probable that a single title can be found in several different colors. The same is true for cart labels. Most often they are black and white but sometimes you’ll see colored labels and other variations.
Since I was completely removing the old labels I took the time to open the cartridge, remove the two PCBs (Printed Circuit Board) and I completely washed the plastic cart with soap and water. Before applying the new label this would be my only chance to give the cart a very thorough cleaning. Most of them really needed it. Twenty years worth of dust and grime really shows! This cleaning didn’t help the existing scuffs and scratches that are very common on gamer condition cartridges but the cleaning was still very worth while.
Check out these excellent after market storage boxes called Shockboxes.
Now that I have applied these perfect and very authentic looking reproduction labels to each of the carts it’s time to hide this fine work inside some beautiful looking storage boxes called Shockboxes; sold by Southtown Homebrew. You can buy these snapcases in various colors (I always choose black) and you can also purchase a Neo Geo MVS cover sleeve/insert to go with the case.
These Shockboxes are a dream come true for collectors like myself. They give a way to display Neo Geo MVS games and make them look really good. The downside is they are not cheap. Each Shockbox with an insert has cost me about $15 CAD each after shipping. I still need about 20 more but I’ll just have to wait until I can afford them. The current strength of the US dollar to the Canadian really isn’t helping my cause at all!
I sometimes surprise myself at how busy I can keep with my video game collection by doing stuff like this; let alone the time spent playing them. There is a lot of unexpected diversity to this hobby.
This is my Sega Master System. There are many like it, but this one is mine.
…and it’s about to become unlike most.
It was actually a long time ago when I first discovered etim.net.au and this excellent aftermarket product made by Tim Worthington for the Sega Master System (SMS).
The FM (Frequency Modulation) Sound Unit is something that came stock with every Japanese Sega Master System but not in any other SMS model. What it did was simple; it greatly enhanced the audio quality of the Sega Master System.
The Japanese Sega Master System included a Yamaha YM2413 FM synthesis chip along with the standard PSG sound. Many games, some of which were never even released in Japan, contain extra FM sound and music. Installing this board will add FM sound capability to any Master System, Mark III, Game Gear*, or Mega Drive* game console. Source
If you have a non-Japanese Sega Master System you’ve been listening to ‘Programmable Sound Generator’ (PSG) music and sound. The difference between PSG and FM sound is very noticeable and for several notable games I find the FM sound to be much better.
You can see (in the images below) by looking at my brand new and still in the package Soldering Iron that I’m new to soldering. This is the biggest reason why it has taken me so long to get around to this mod. Fear.
I have a good condition Sega Master System that works perfectly. There is nothing wrong with it and was so afraid of killing it. There is a distinct point of no return when applying this mod…
This is my Sega Master System
This is my SMS on the Operating Table
The easy part was purchasing this custom made FM Sound unit from etim. For $71 (after shipping) I acquired this small bit of hardware that would transform my NTSC Sega Master System into what it should have always been. And finally making it an equal to it’s Japanese sibling.
From etim I also found instructions for installing the FM Sound Unit. My FM Unit is version 2.1 and my SMS is NSTC so I knew which instructional diagram to reference.
What I didn’t notice was the appended note that stated:
“Note that the diagram below is incorrect, the white/red indicators are swapped around.”
My Sony chip actually showed a different number. But I was still confident that I was in the right area of the Mother Board.
Yeah, you guessed it. I did it wrong the first time around! But as hard as soldering can be for a novice it’s also forgiving and you can undo many mistakes.
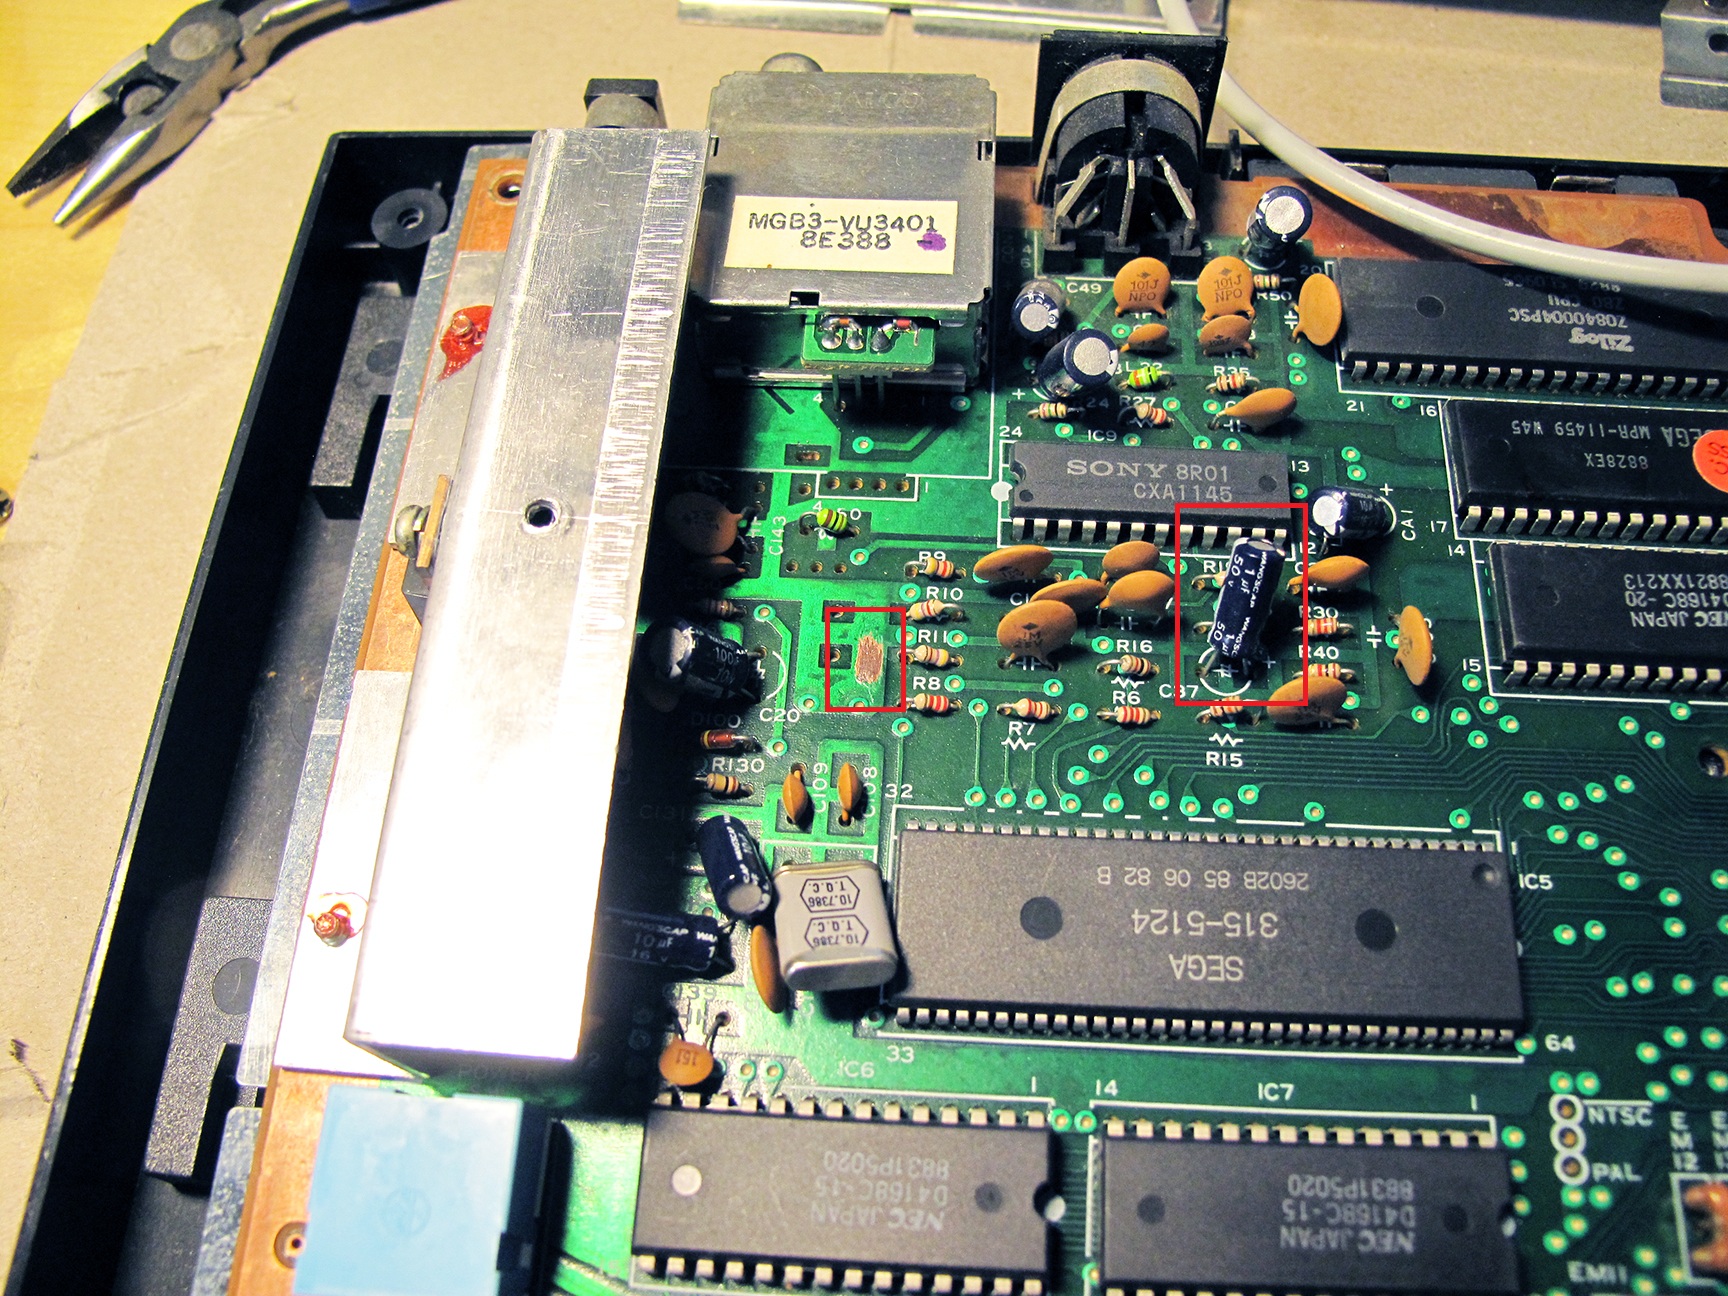
Here’s a close up of my SMS mother board highlighting (in Red) the three areas where the work will be done:
My SMS before the point of no return.
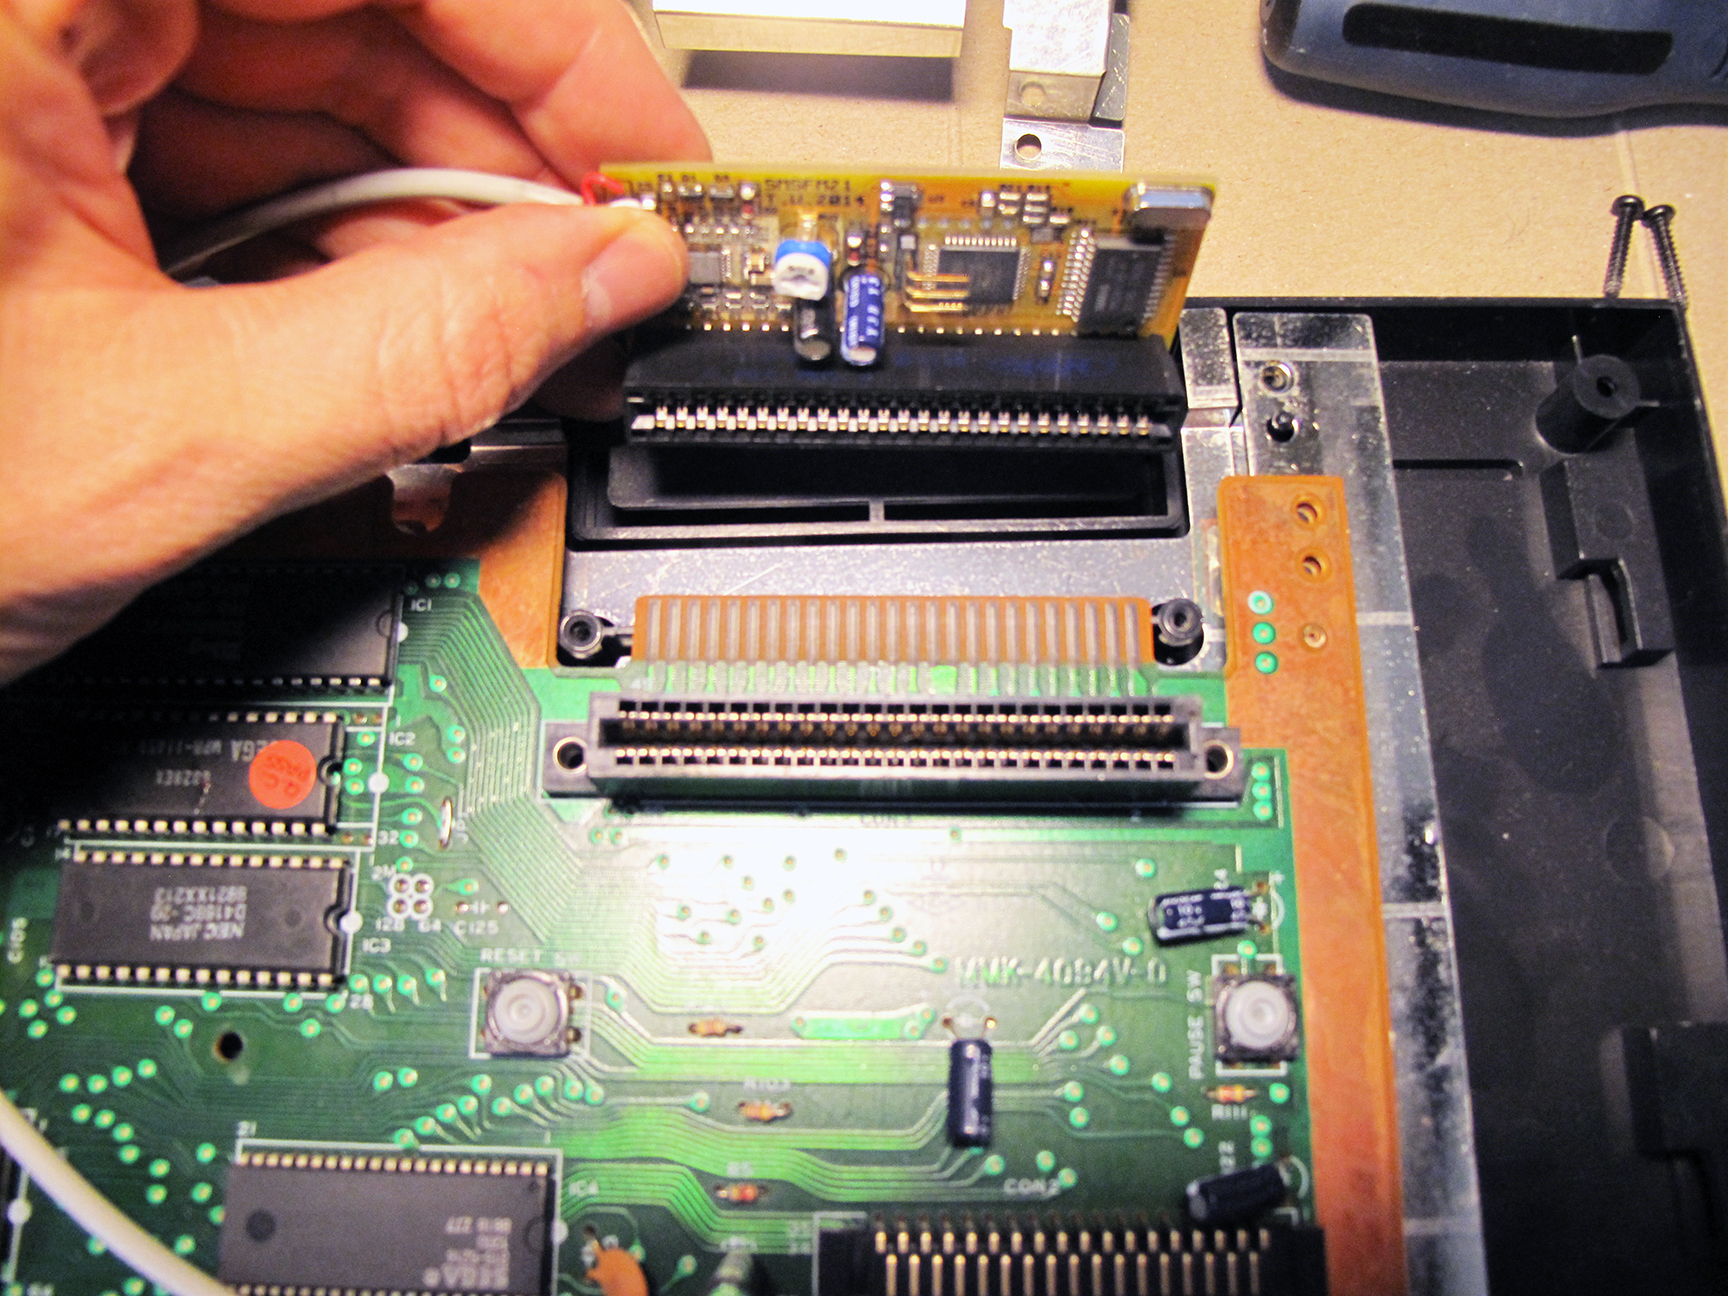
The first step was to install the FM board on the expansion port on the back of the SMS, just behind the cartridge slot. It’s stiff but popped into place very nicely. So far so good!
On the count of 1,2…3!
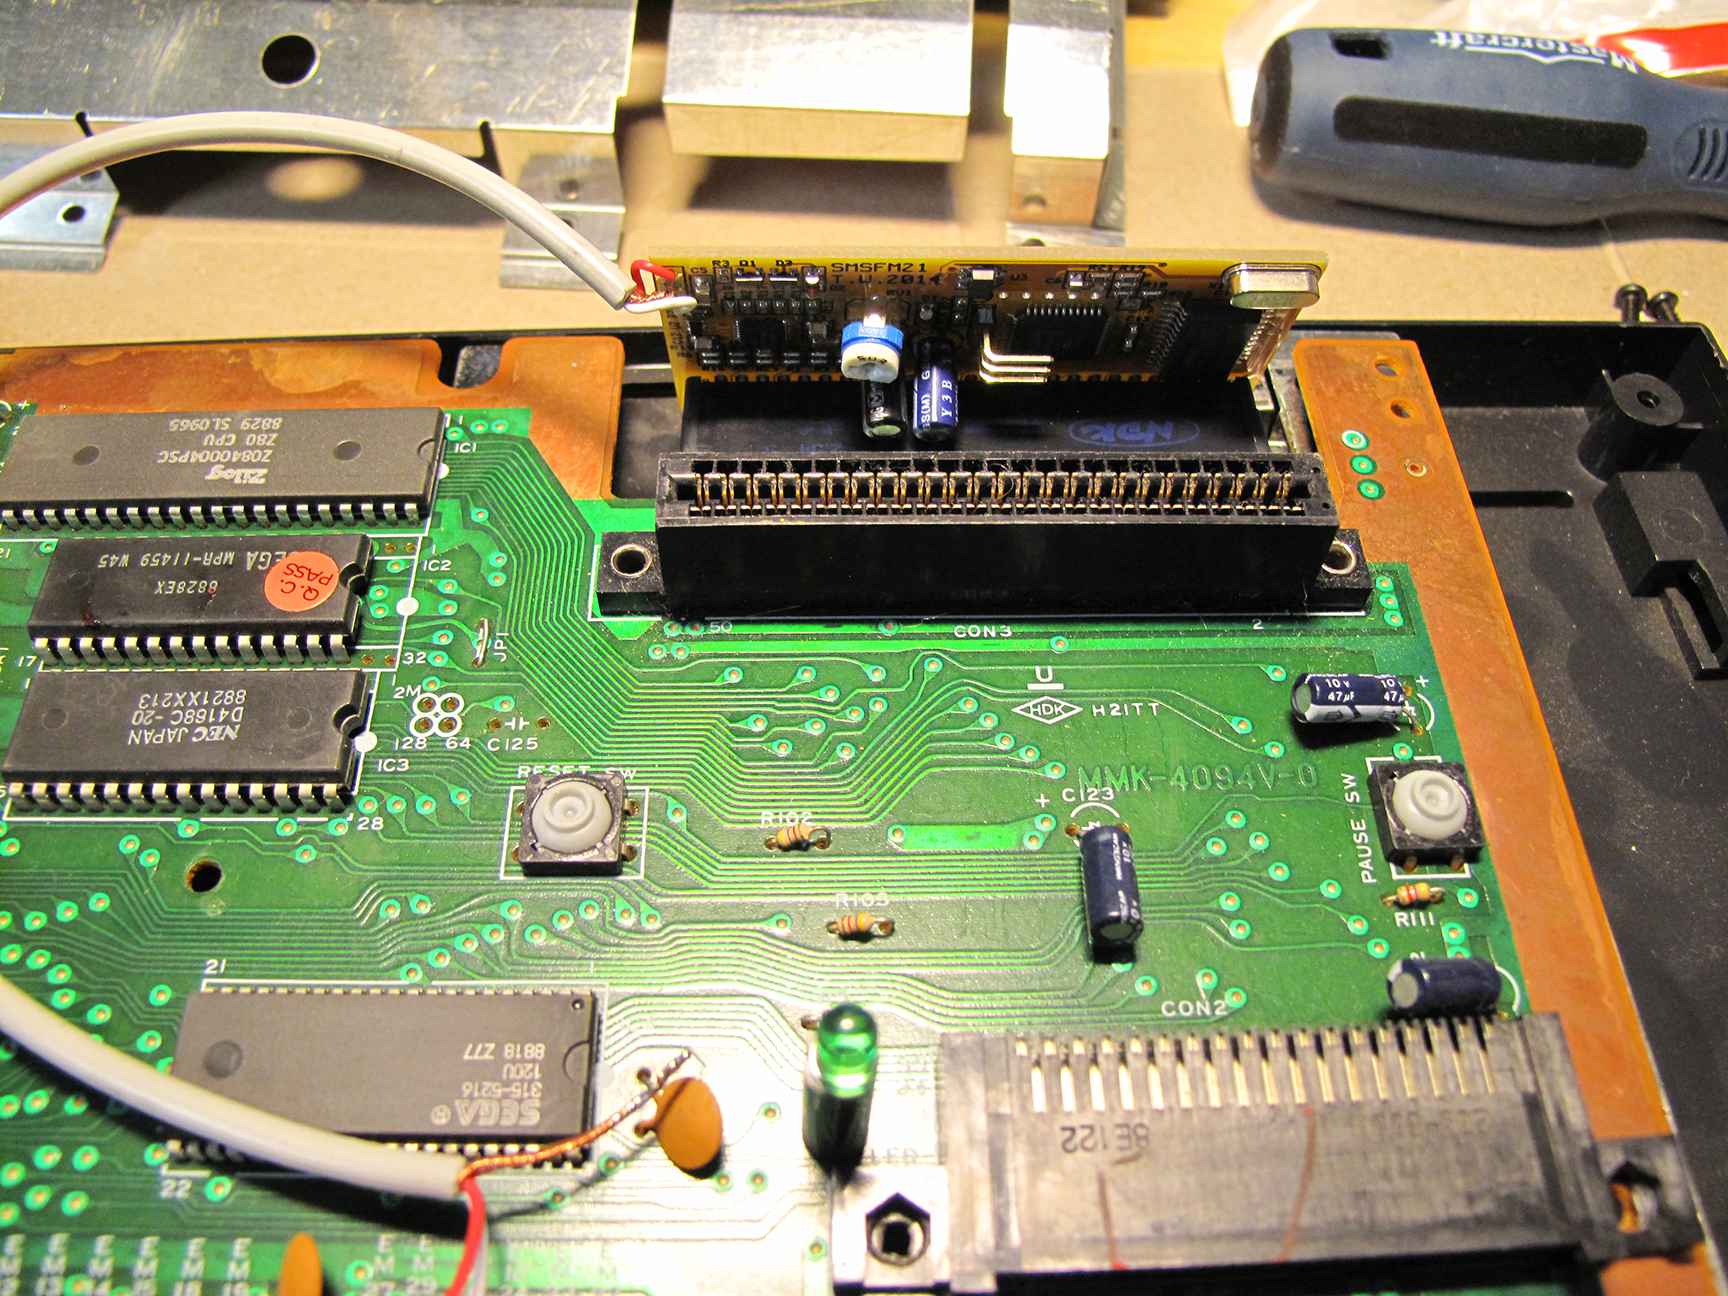
Installed! …the easy part.
Next I had to prepare three areas on the motherboard for soldering. This involved scratching away some of the green coating on the PCB (Printed Circuit Board) to expose an area to solder the copper ground from the FM unit.
I also had to remove a capacitor. Cutting off the capacitor at C37 was really the scariest moment of this mod. It really felt like the point of no return. Without this capacitor the SMS would still work but there would be no sound. I discovered this when I had my Red and White wires reversed when testing after my first attempt.
Exposed area for Ground. (Left Square)
Cut off capacitor. Replaced with 2 wires.
I really didn’t feel confident about cutting off the blue capacitor that you see in the image above (left). The capacitor stands on two legs and I cut it off leaving both legs behind. I though doing this would make it easier to solder the two FM wires to remaining legs. After reading a bit more about soldering I think I should have removed the legs and soldered my wires directly into the wholes that would have been left behind had I completely removed the legs. I might revisit this someday.
Here’s a zoomed out image of the finished job:
My newly install FM Sound Unit.
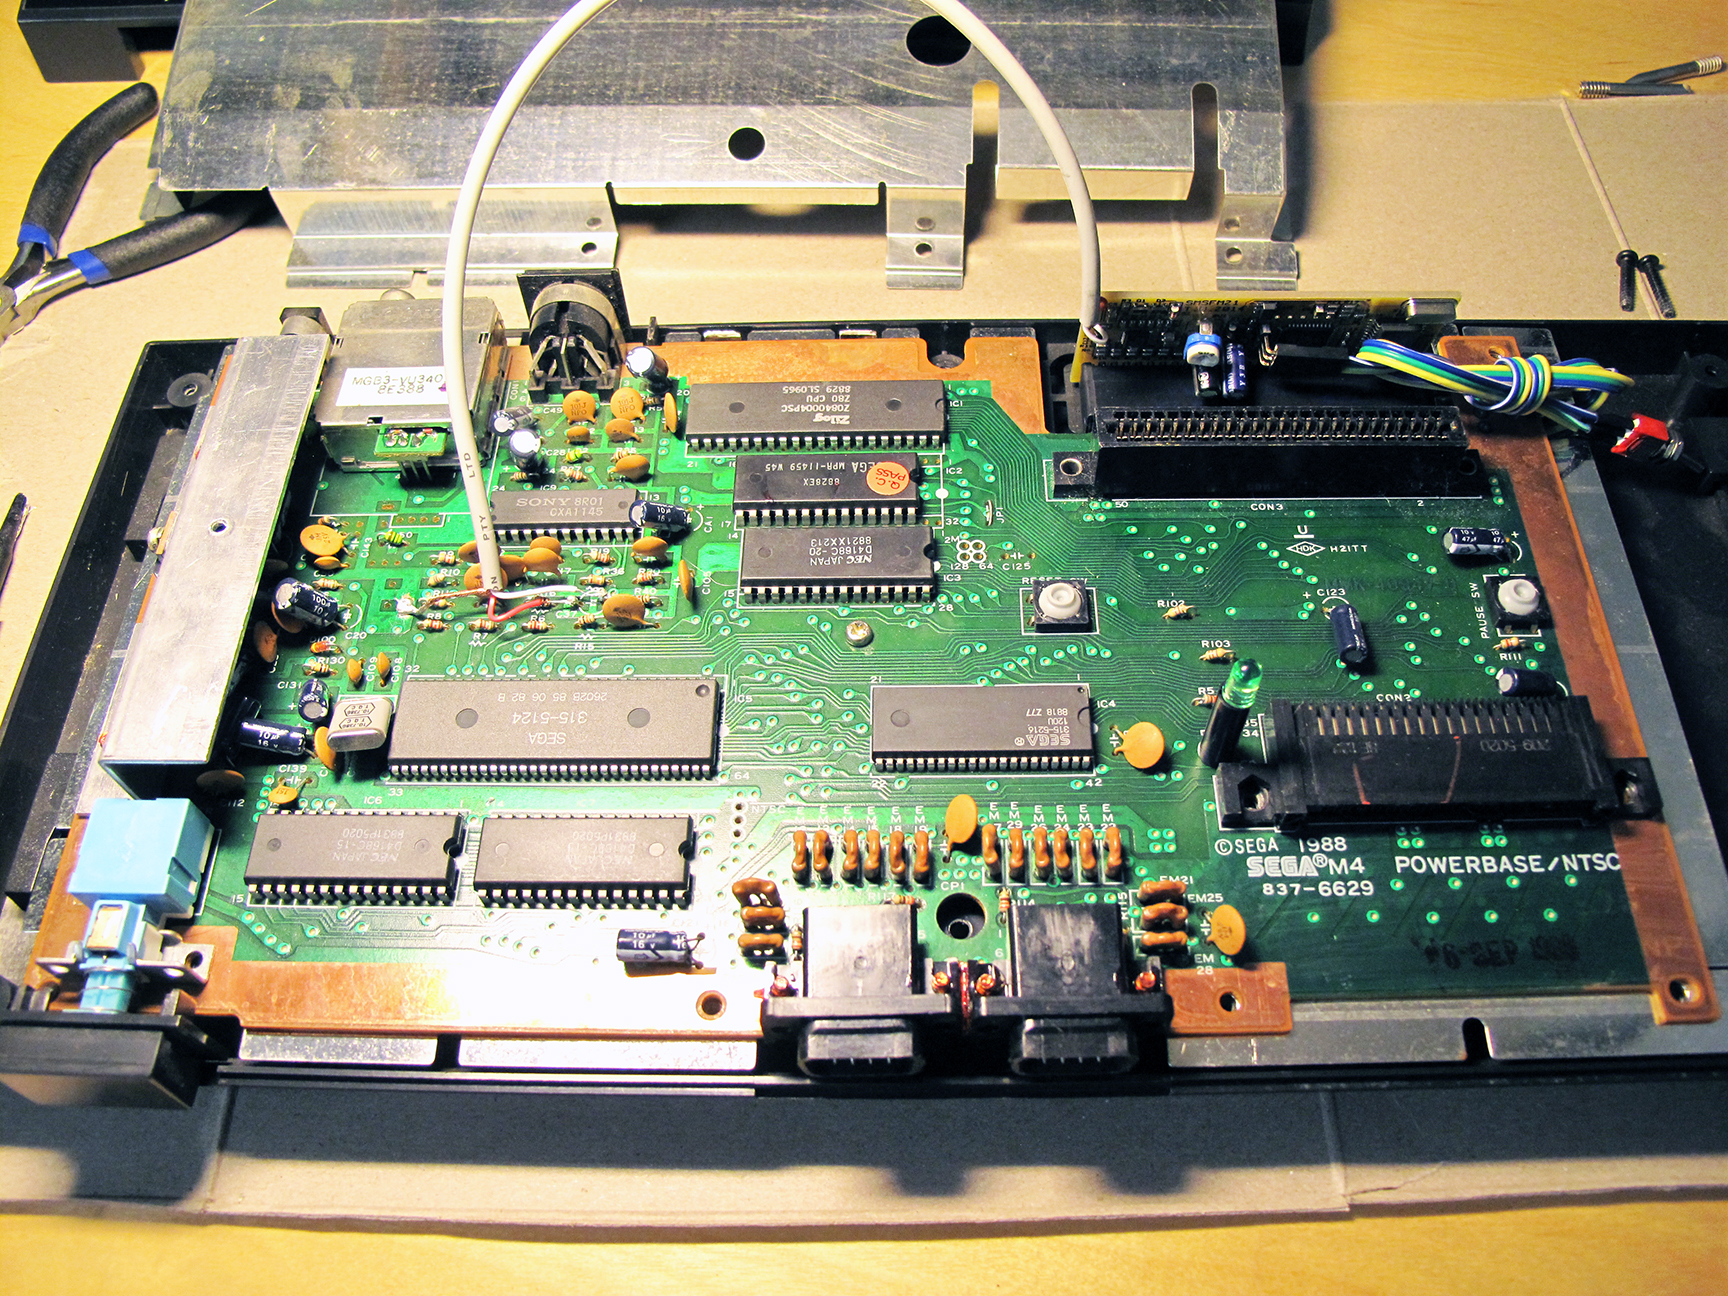
The mod comes with a 3-way switch which easily connects to the FM unit. This switch allows you to toggle the FM unit into 3 modes. Original PSG sound, FM Sound and Japanese FM Sound.
Some Master System games (such as Monster World III: The Dragon’s Trap) would only play the games FM sound on Japanese region systems. This switch allows for all options to ensure you’ll get to hear the magic of FM sound for any game that has it.
Note: My NTSC Monster World III did not play FM sound. Some versions of games had their FM sound code removed. I’m going to guess that Monster World III would play FM sound if I used the Japanese cart (with an adapter to make it fit my NTFS SMS). I don’t have an adapter to test this theory.
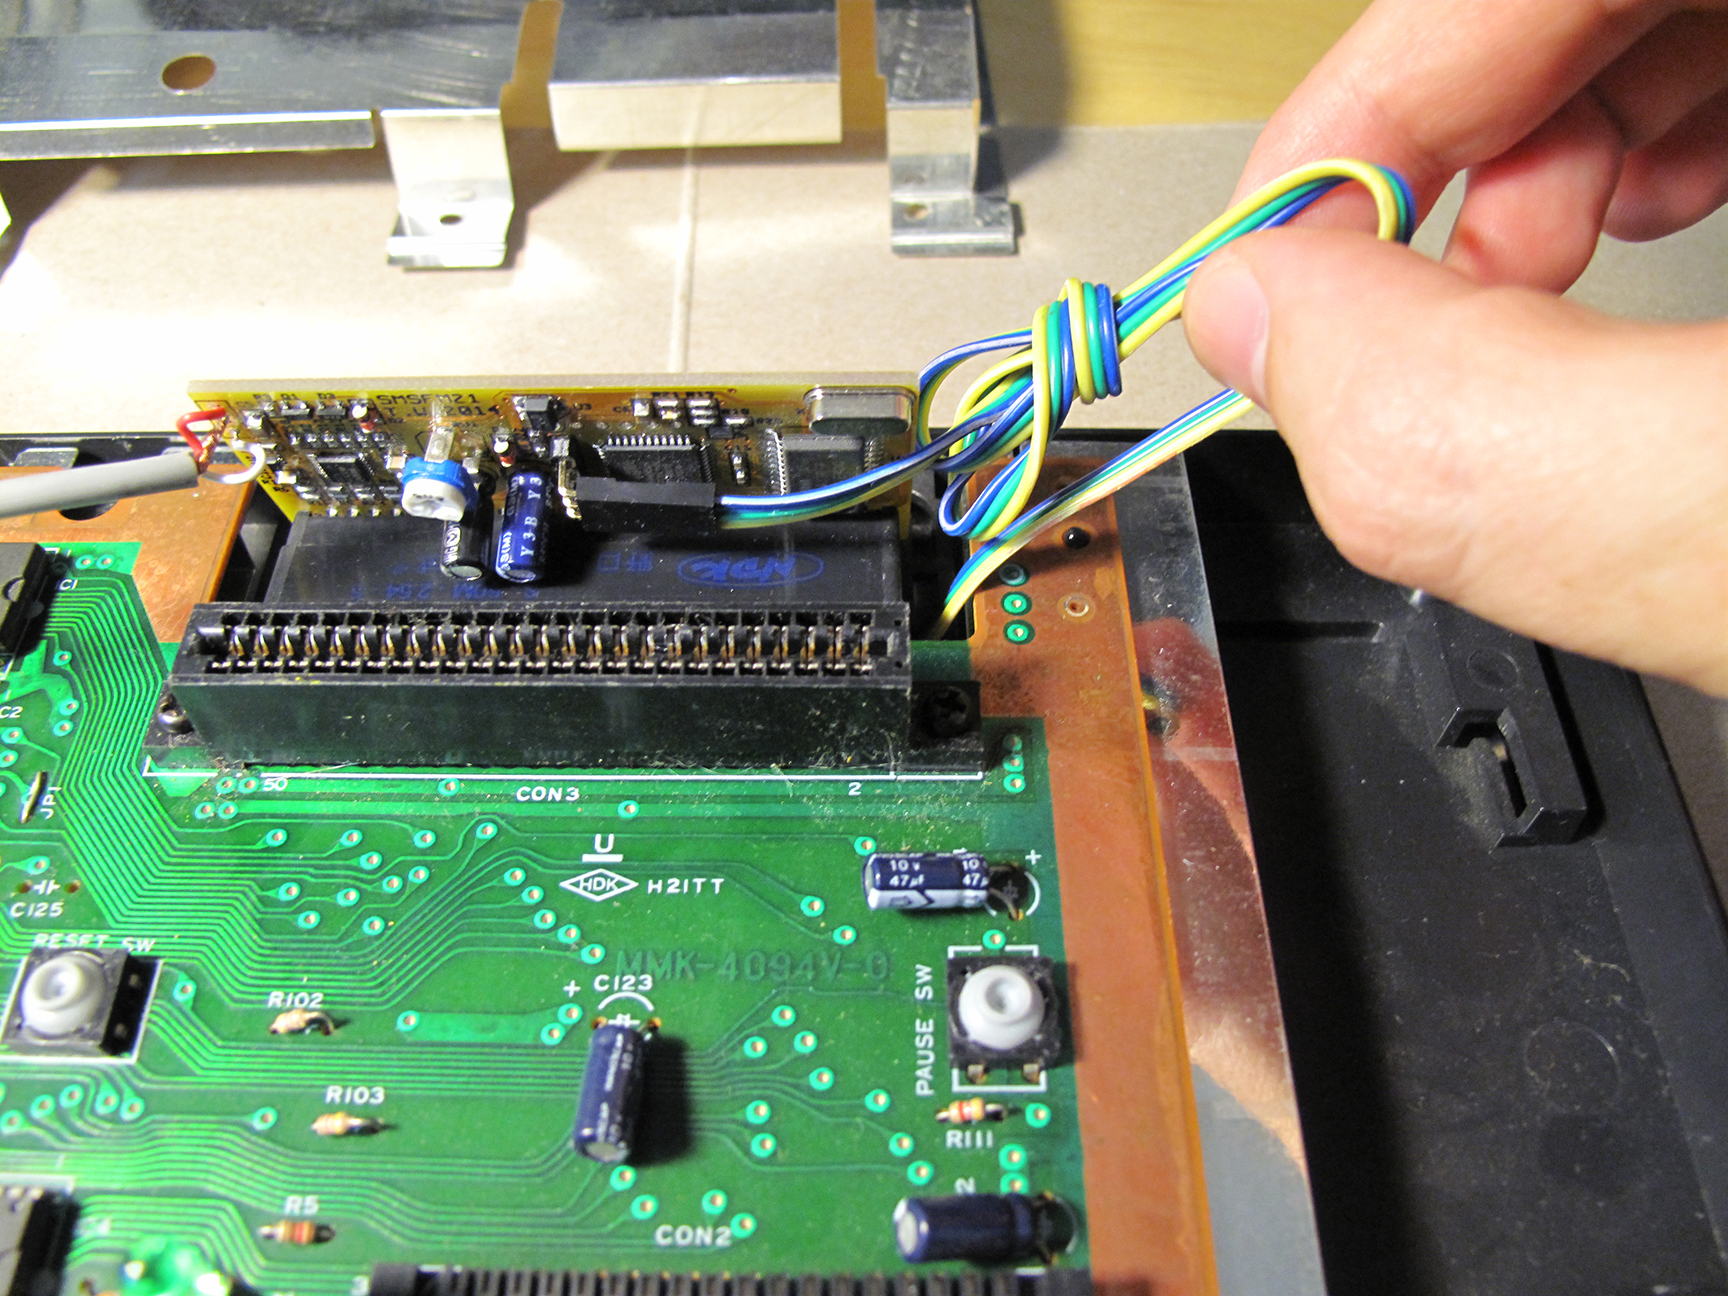
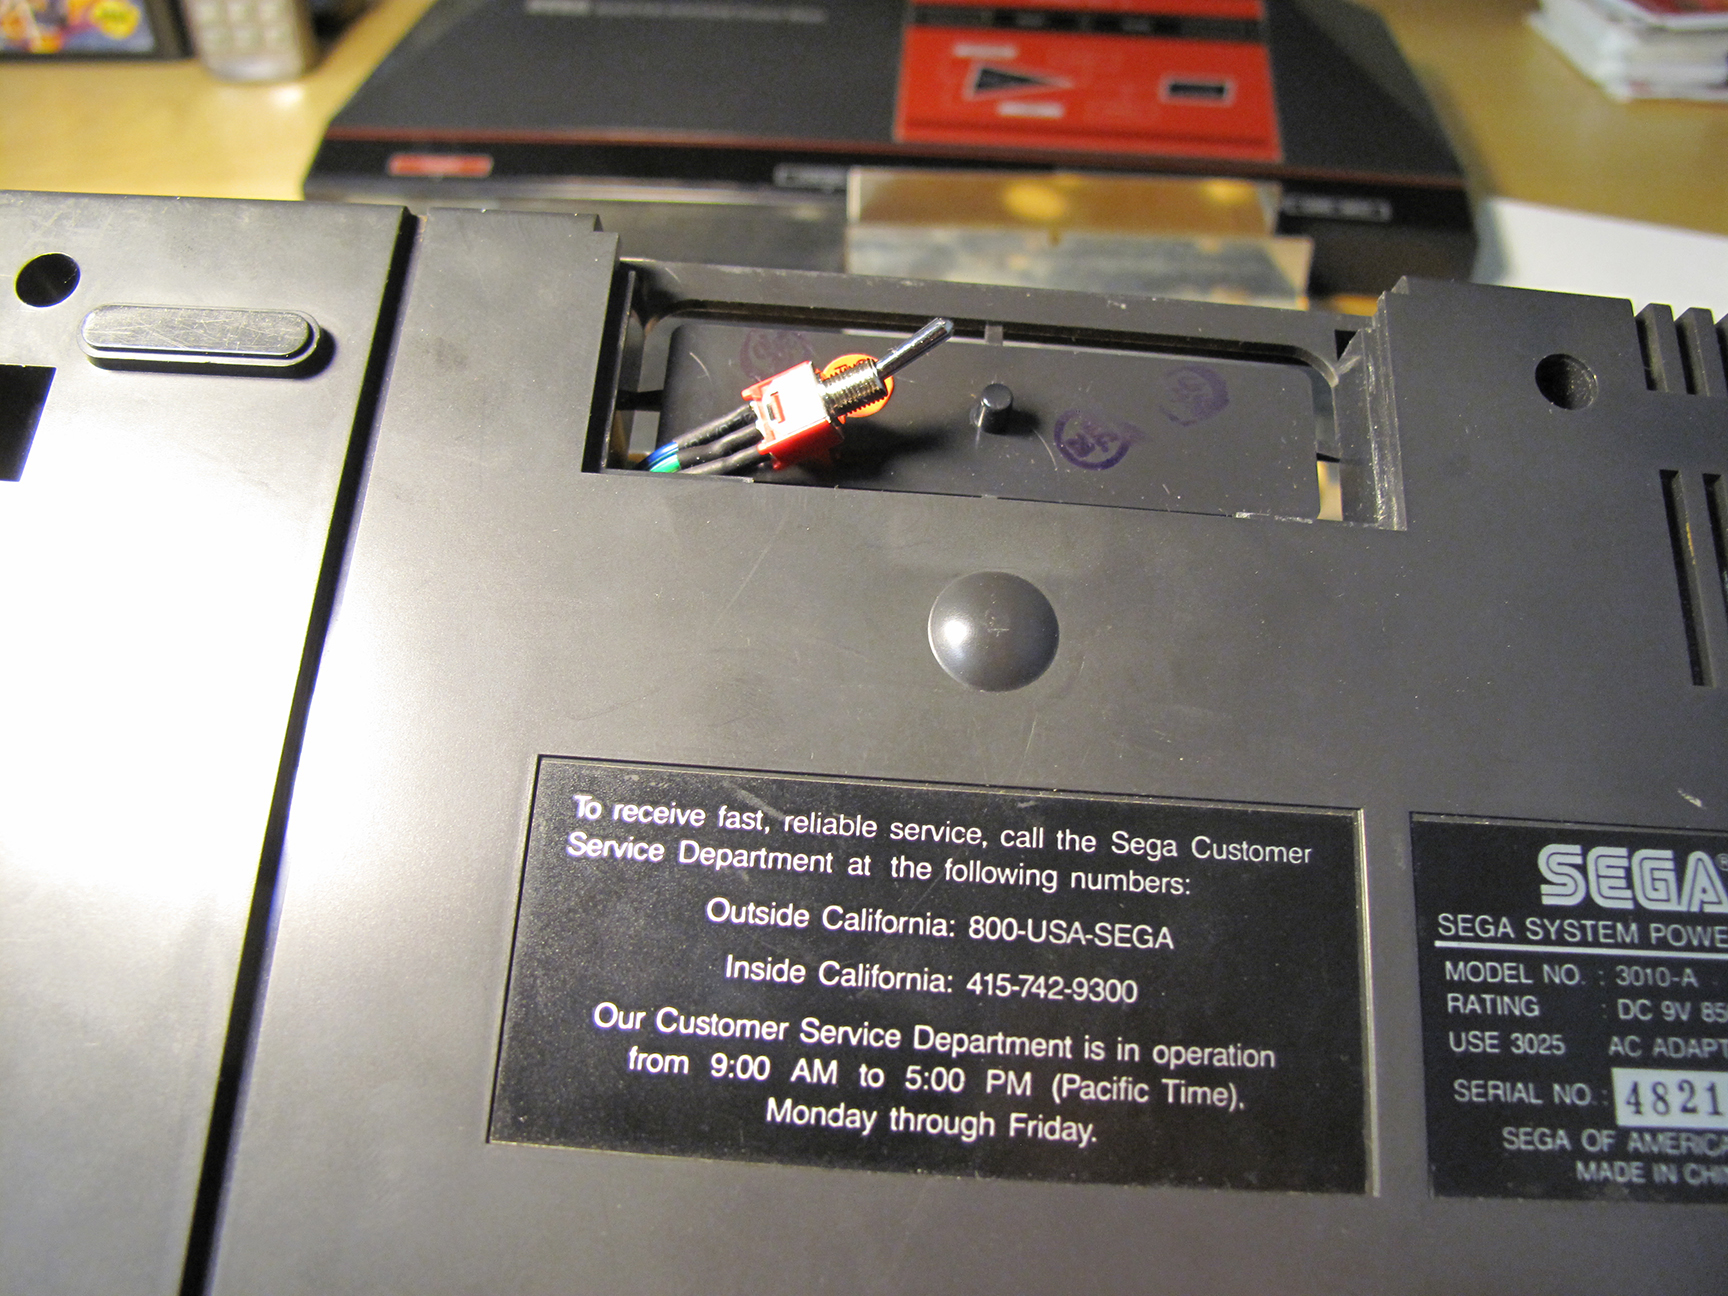
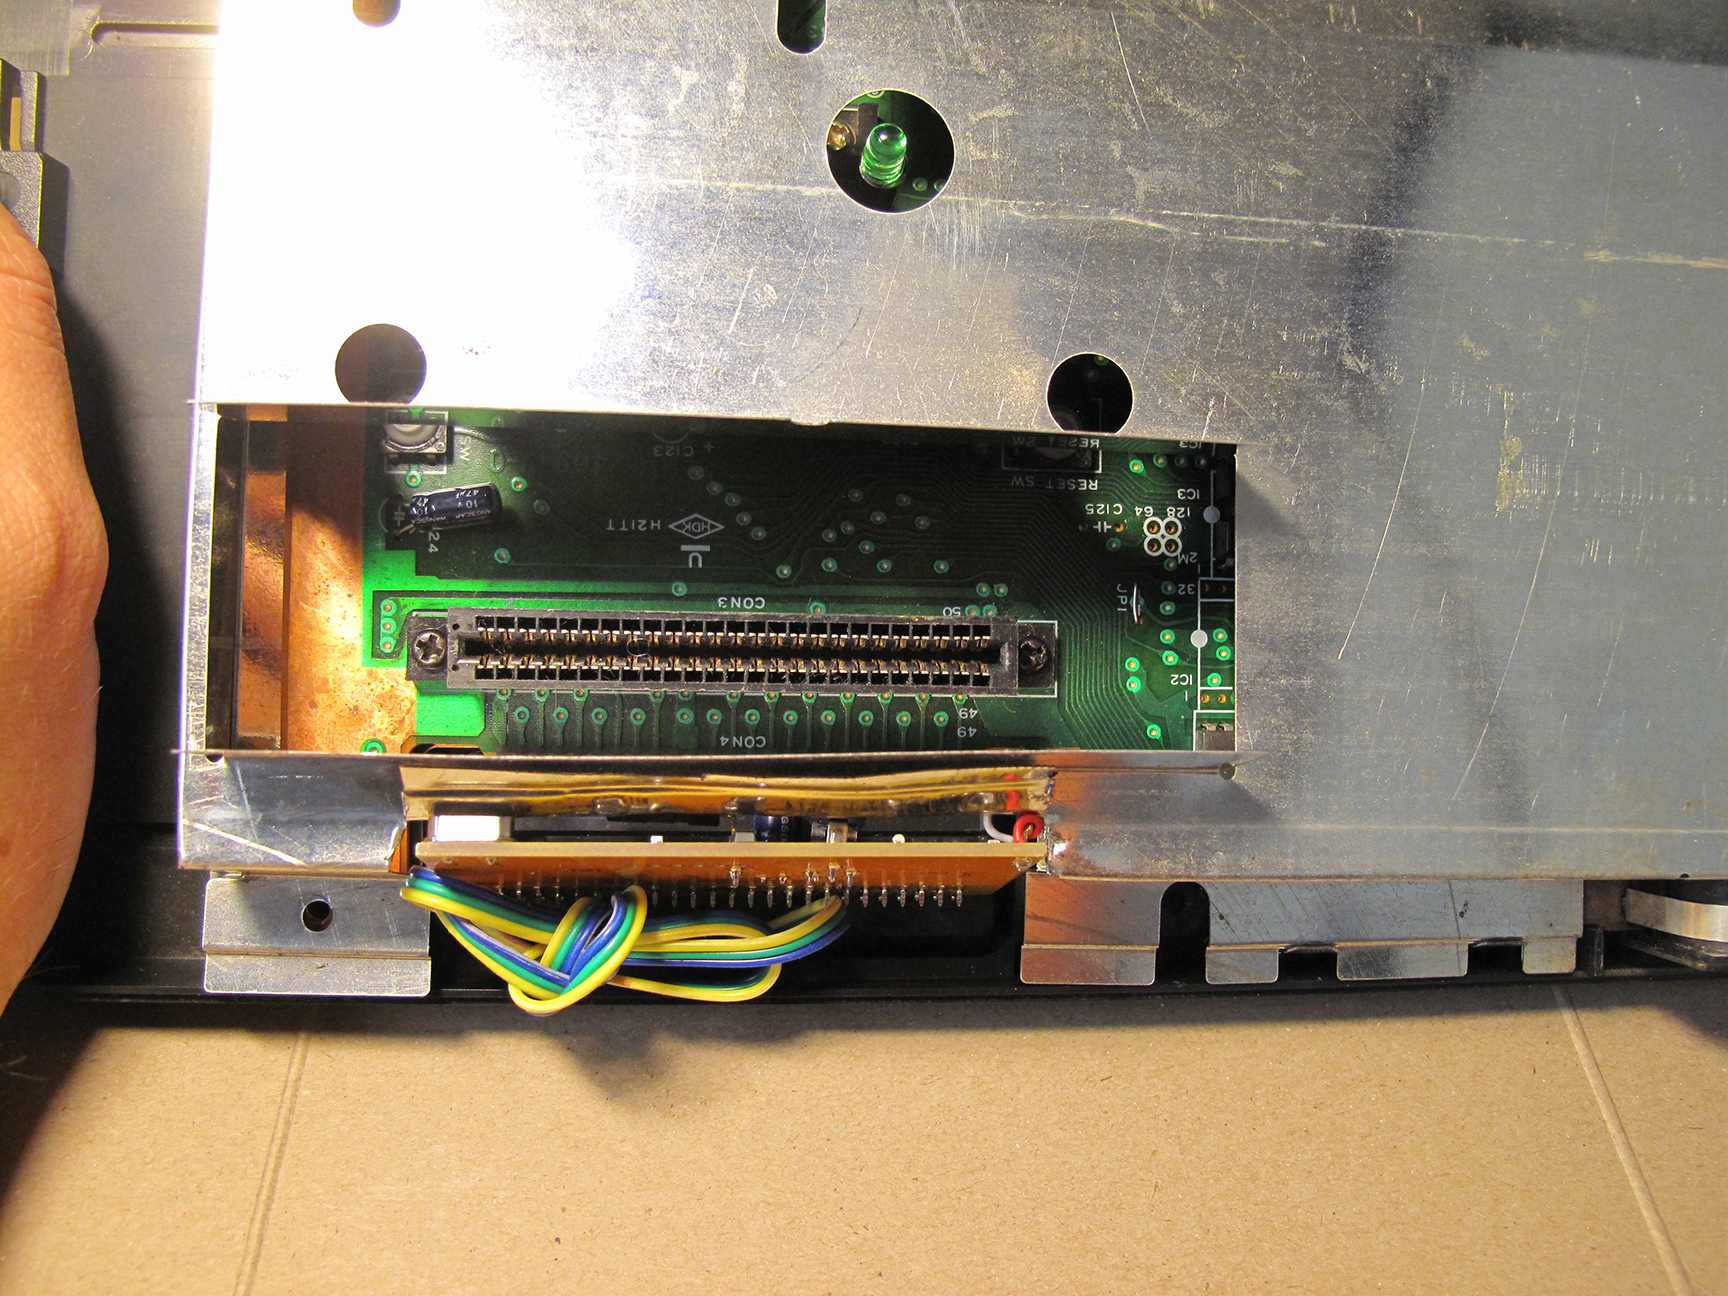
I was concerned about the wire for the 3-way switch getting in the way of a cartridge so I wanted to get it completely out of the way. I wrapped up some of the extra length and left enough to snake the switch down past the mother board and through a hole in the plastic of the case that leads to a small compartment on the bottom side of the Sega Master System. This compartment has a removable cover and it was there to support some add-on that Sega never ended up using. For me this was the perfect place to put the switch. It’s hidden but still accessible without having to take the whole case off the SMS. And I didn’t have to further modify my SMS by cutting holes into it.
The idea was that once I got the cover back on the SMS would look pure and unmodified. I’m not opposed to drilling a clean hole to mount the switch but for now I’m happy with this solution.
Snaked the wire under the Board and through the plastic casing.
The original cover will still easy fit into place; completely hiding the switch.
Now it’s time to re-assemble! First put the shield back on… It won’t fit anymore. OK, so my SMS has to endure some more permanent modifications. I cut off all of those metal flaps you see below (left) and folded up the remaining piece so that it was out of the way. The wire cutters you see pictured didn’t work out. I had to switch to full blown tin snips to get the job done.
It wont close!
Time to cut again!
Now the shield fits! And everything is looking pretty clean and tidy.
It fits!
Top down view.
And what do I get for all of this effort?
The two video clips below I made from recording the games Miracle Warriors and Golvellius. For each I let the recording run for a full cycle of each selected tune; stopping the recording before the song looped and started again. I then edited the recordings so that the same tune in FM sound would play right after the PSG version. Making it easy to hear the difference.
For Miracle Warriors I chose to compare the PSG and FM version of: the Title Screen, the Travel/Map Screen, the Castle and Combat/Encounter tunes.
I did pretty much the same thing for Golvellius. Comparing the Title Screen, the Story Intro, Old Lady, Dungeon and Above Groundtunes.
For those of you don’t want to commit to listening to close to 14 minutes of comparisons feel free to skip forward through the videos, sampling as much or as little as you like 🙂
I haven’t yet heard the FM versions of all the games that support FM sound but I’ve heard many and to me Miracle Warriors is one that really stands out. I love the FM version for this game.
And while there is also a distinct difference when listening to Golvellius I found that both the PSG and FM sound were good. I can’t say for certain that I like the FM more than the PSG in this particular example. So as much as I am enjoying the FM sounds the default PSG is also pretty good.
Miracle Warriors PSG vs. FM Sound
Golvellius PSG vs. FM Sound
In the video below you can sample FM sound from several different games that support the feature. I’ve noticed that the good SMS games really benefit from the extra polish of the FM sound track. Giving an extra incentive to revisit some old favorites. But for weaker games (like Rampage, Altered Beast and Afterburner) the FM sound isn’t enough to make them more appealing.
I love the change the FM Sound Unit has brought to my Sega Master System.
The games that I think get the most out of FM Sound are Miracle Warriors, Fantasy Zone 2 and Double Dragon.
Note: I actually really like Phantasy Star with FM sound but the English version does not support FM so I’m not able to try it out first hand. There is a translated version with the FM code but it would take some work to get it on a cartridge.
What do you think? Is FM Sound superior, better, different but equal or worse than PSG?
I have to say after making just three solder joints and having this thing work as expected I felt like a GOD!!
Sure, I didn’t design or make the board and I don’t have a clue as to how it works but I applied heat. And that has to count for something.
I do know that this site is called The Sega Collection but it’s hard to exclude a video game system that cost me $650 CAD. I feel compelled to show it off. 😀
Weighing in at 250 lbs (113 Kg) and standing 6′ (183 cm) tall this is my new SNK Neo Geo MVS Arcade Cabinet.
Also known as Big Red.
My Big Red: SNK Neo Geo MVS Arcade Cabinet
Neo Geo (ネオジオ?) is a family of video game hardware developed by SNK. The brand originated in 1990 with the release of an arcade system, the Neo Geo MVS and its home console counterpart, the Neo Geo AES. Both the arcade system and console were powerful for the time and the AES allowed for perfect ports of games released for the MVS.
–wikipedia.org
Why didn’t I get a MAME box? I still might someday but for me I really enjoy having the real thing. And this beast actually lived out is glory days in actual bonafide arcades. Maybe you’ve played on my Big Red! Who knows?!
$650 is a lot of money to drop on anything. Especially something that is such a pain in the butt to move. But it did come with four games to help soften the purchase price.
Included games:
NAM-1975 Custom Case Cover Art
NAM-1975 Screen Shot
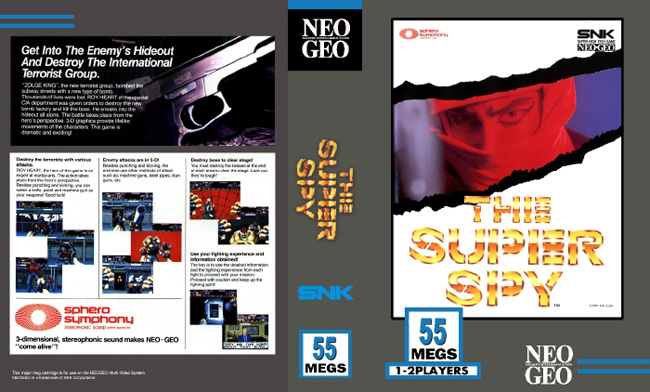
The Super Spy Custom Case Cover Art
The Super Spy Screen Shot
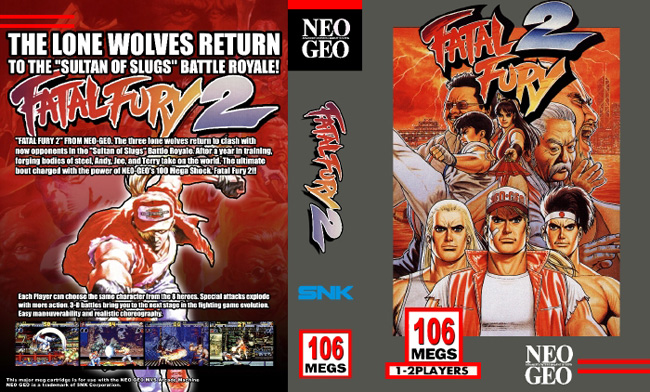
Fatal Fury 2 Custom Case Cover Art
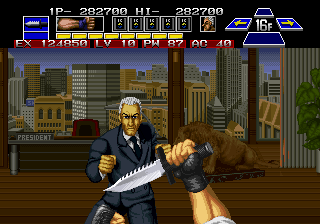
Fatal Fury 2 Screen Shot
Baseball Stars Custom Cover Art
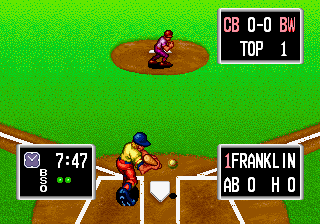
Baseball Stars Screen Shot
These are all common and cheap (for Neo Geo) games but it was still nice to get some throw-ins. And NAM-1975 is one that I really wanted. NAM-1975 was the first Neo Geo game I saw when the system was new and it blew my mind. It’s hard to describe how much better the Neo Geo looked compared to the Genesis or SNES. Back in the day the distinction in the graphics felt massive.
Today the gap in graphical fidelity feels very small. But in the late 90’s the Neo Geo was a boheimeth that could not be touched; or afforded by most of us. Unless you were content feeding quarters to a Big Red in the arcades.
But if you did have the money you could purchase the home version of the Neo Geo called the Neo Geo AES (Advanced Entertainment System) which was exactly the same hardware as the Neo Geo MVS (Multi Video System) in the arcades.
The arcade version was called MVS because many Neo Geo arcade cabinets could hold more then one game; either 2,4, or 6 games. And by the use of the ‘Select Game’ button you could cycle through the selection and pick the one you wanted to play. This was a very unique feature in the 90’s.
I found this Neo Geo MVS 4-slot (can hold 4 games at once) from Kijiji. The previous seller had done a fantastic job restoring it. As a result it’s not entirely stock. The cabinet was sanded down and re-painted. And the lettering you see are vinyl stickers. Originally the lettering would have been painted on. But the important thing is my Neo Geo looks perfect… Even though its not.
There is some work left for me to do. Here’s my ‘to do’ list for my Big Red (keeping in mind I don’t know how to do anything of this):
1) Replace capacitors on the Monitor 2) Fix Slot Two 3) Fix Mini Marquee 4) Install Power Switch
1) The monitor is old… really old. And despite looking pretty good there is an issue. On the top 1/5 of the screen there are some faint lines and a bit of distortion. On some games you really don’t notice it at all but on other it’s more apparent.
I’ve opened up the cabinet and found many different dials and magnets to adjust the picture quality and none of them seem to help with this issue. So I think (even though I really have no idea) that the capacitors on the monitor need to be replaced. This involves buying what’s called a cap kit for my specific monitor and de-soldering the old capacitors and soldering on the new ones from the cap kit. Since I’m very inexperienced with soldering I think I’m going to hire someone to do this for me.
You also have to be very careful about discharging a CRT monitor before working on it. And I mean seriously careful. Discharging a CRT monitor incorrectly could give you an electrical shock strong enough to kill you. Seriously.
2) This next issue is also going to be tough but I am going to attempt it myself. Any game cartridge that is inserted in slot 2 will show vertical lines through all the character sprites on screen. My guess is that there is a capacitor (or a few) that need to be replaced or possibly one (or several) traces that are damaged. On Printed Circuit Boards (PCB) the traces are the thin copper lines that travel from on location on the board to another connecting the different components. They are pathways.
I may not be able to do this myself but I am going to try.
3) The Marquee at the top of the cabinet contains four mini-marquees to show the player what games are installed. When you press the Game Select button the Marquee will light up the mini-marquee poster that corresponds to the selected game.
Currently mine will not light up at all. I don’t know yet what’s involved. It’s not an essential feature but it’s a cool one that I would like to get working again.
4) Arcade cabinets were originally meant to be left on almost all the time. Turning them off was often done by just pulling the power plug. Since mine is very hard to get behind because of how I’ve positioned into a corner of my retro game room I’m currently using a power bar that’s long enough to sit right beside the cabinet. With my big toe I can flip the system on or off. It works perfectly but someday I’d like to install something a bit more polished.
The reason why the Neo Geo MVS has become my first Arcade Cabinet is because of the multiple slots for games. Almost all Arcade cabinets required changing out the mother board in order to change the game in the cabinet. But the Neo Geo MVS used the familiar cartridge; albeit very large! The game cartridges are plentiful and for the most part affordable (with the exception of ebay).
This single giant box does take up a lot of room but it’s very easy to swap out the games. Allowing me to continue to collect for the Neo Geo MVS and enjoy the purest of Arcade experiences for each and every SNK Neo Geo MVS games I purchase. And it looks really awesome 🙂
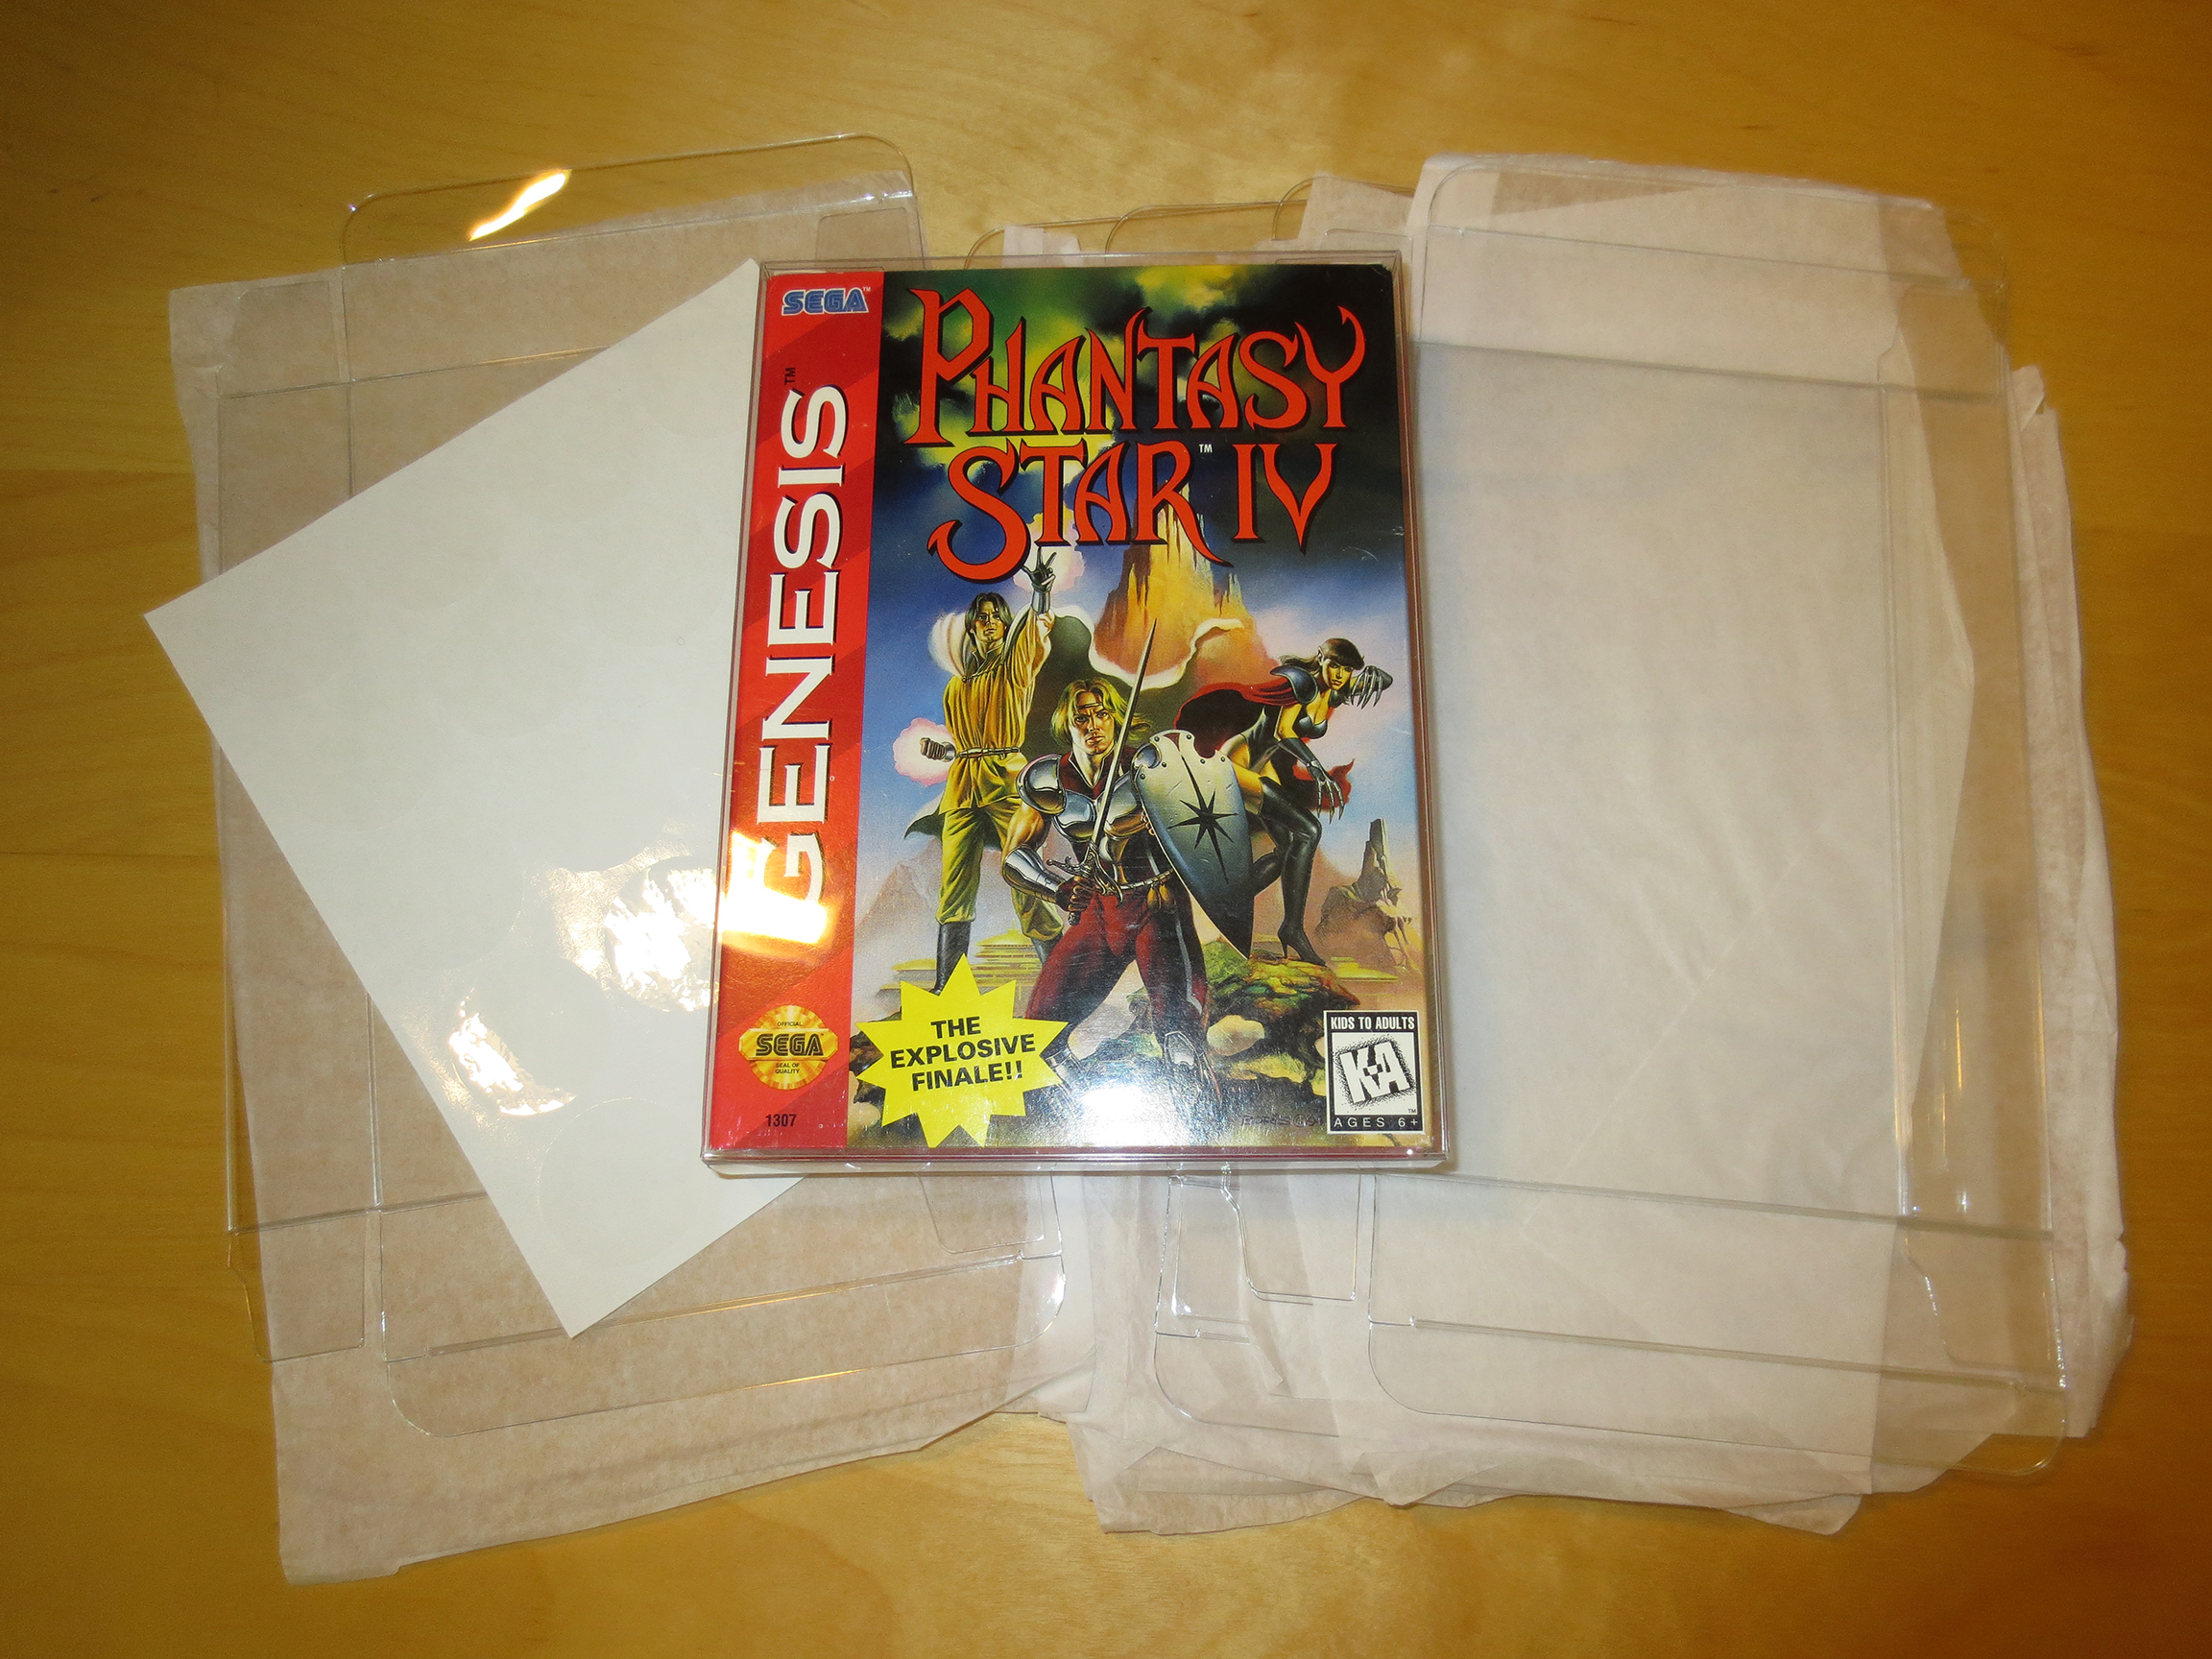 They ship flattened and padded with tissue.
 One empty and one with a game.
 A few games decked out in these new boxes.
 All of my newly boxed Cardboard games.
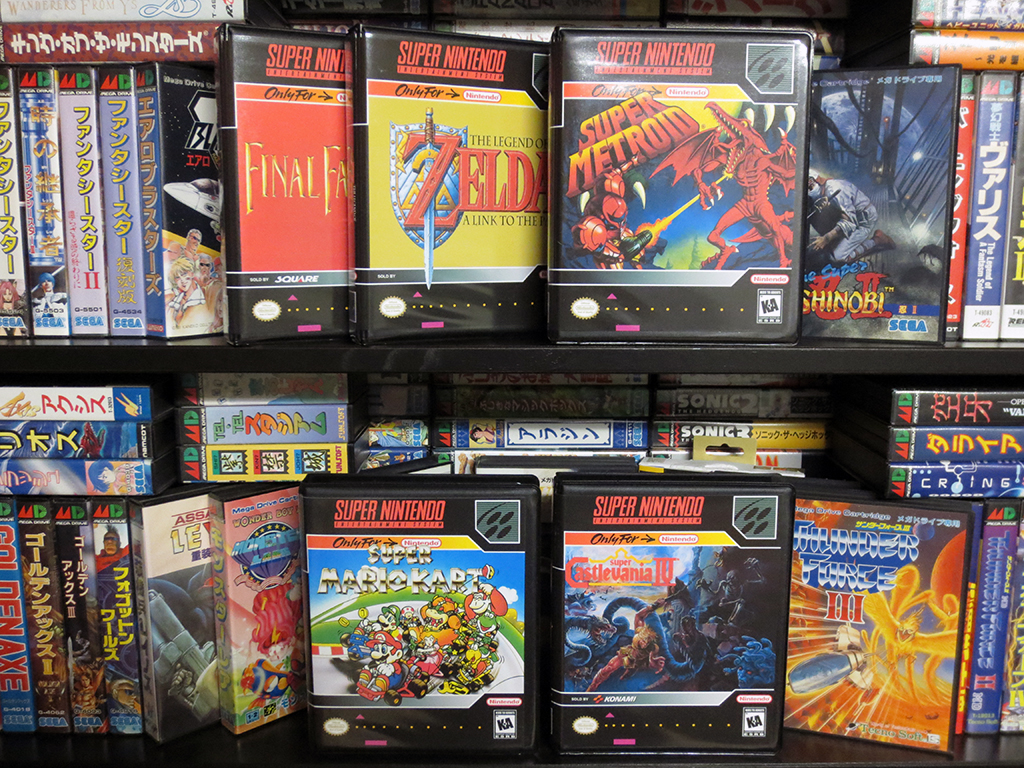 BitBoxes for some of my favorite SNES games.
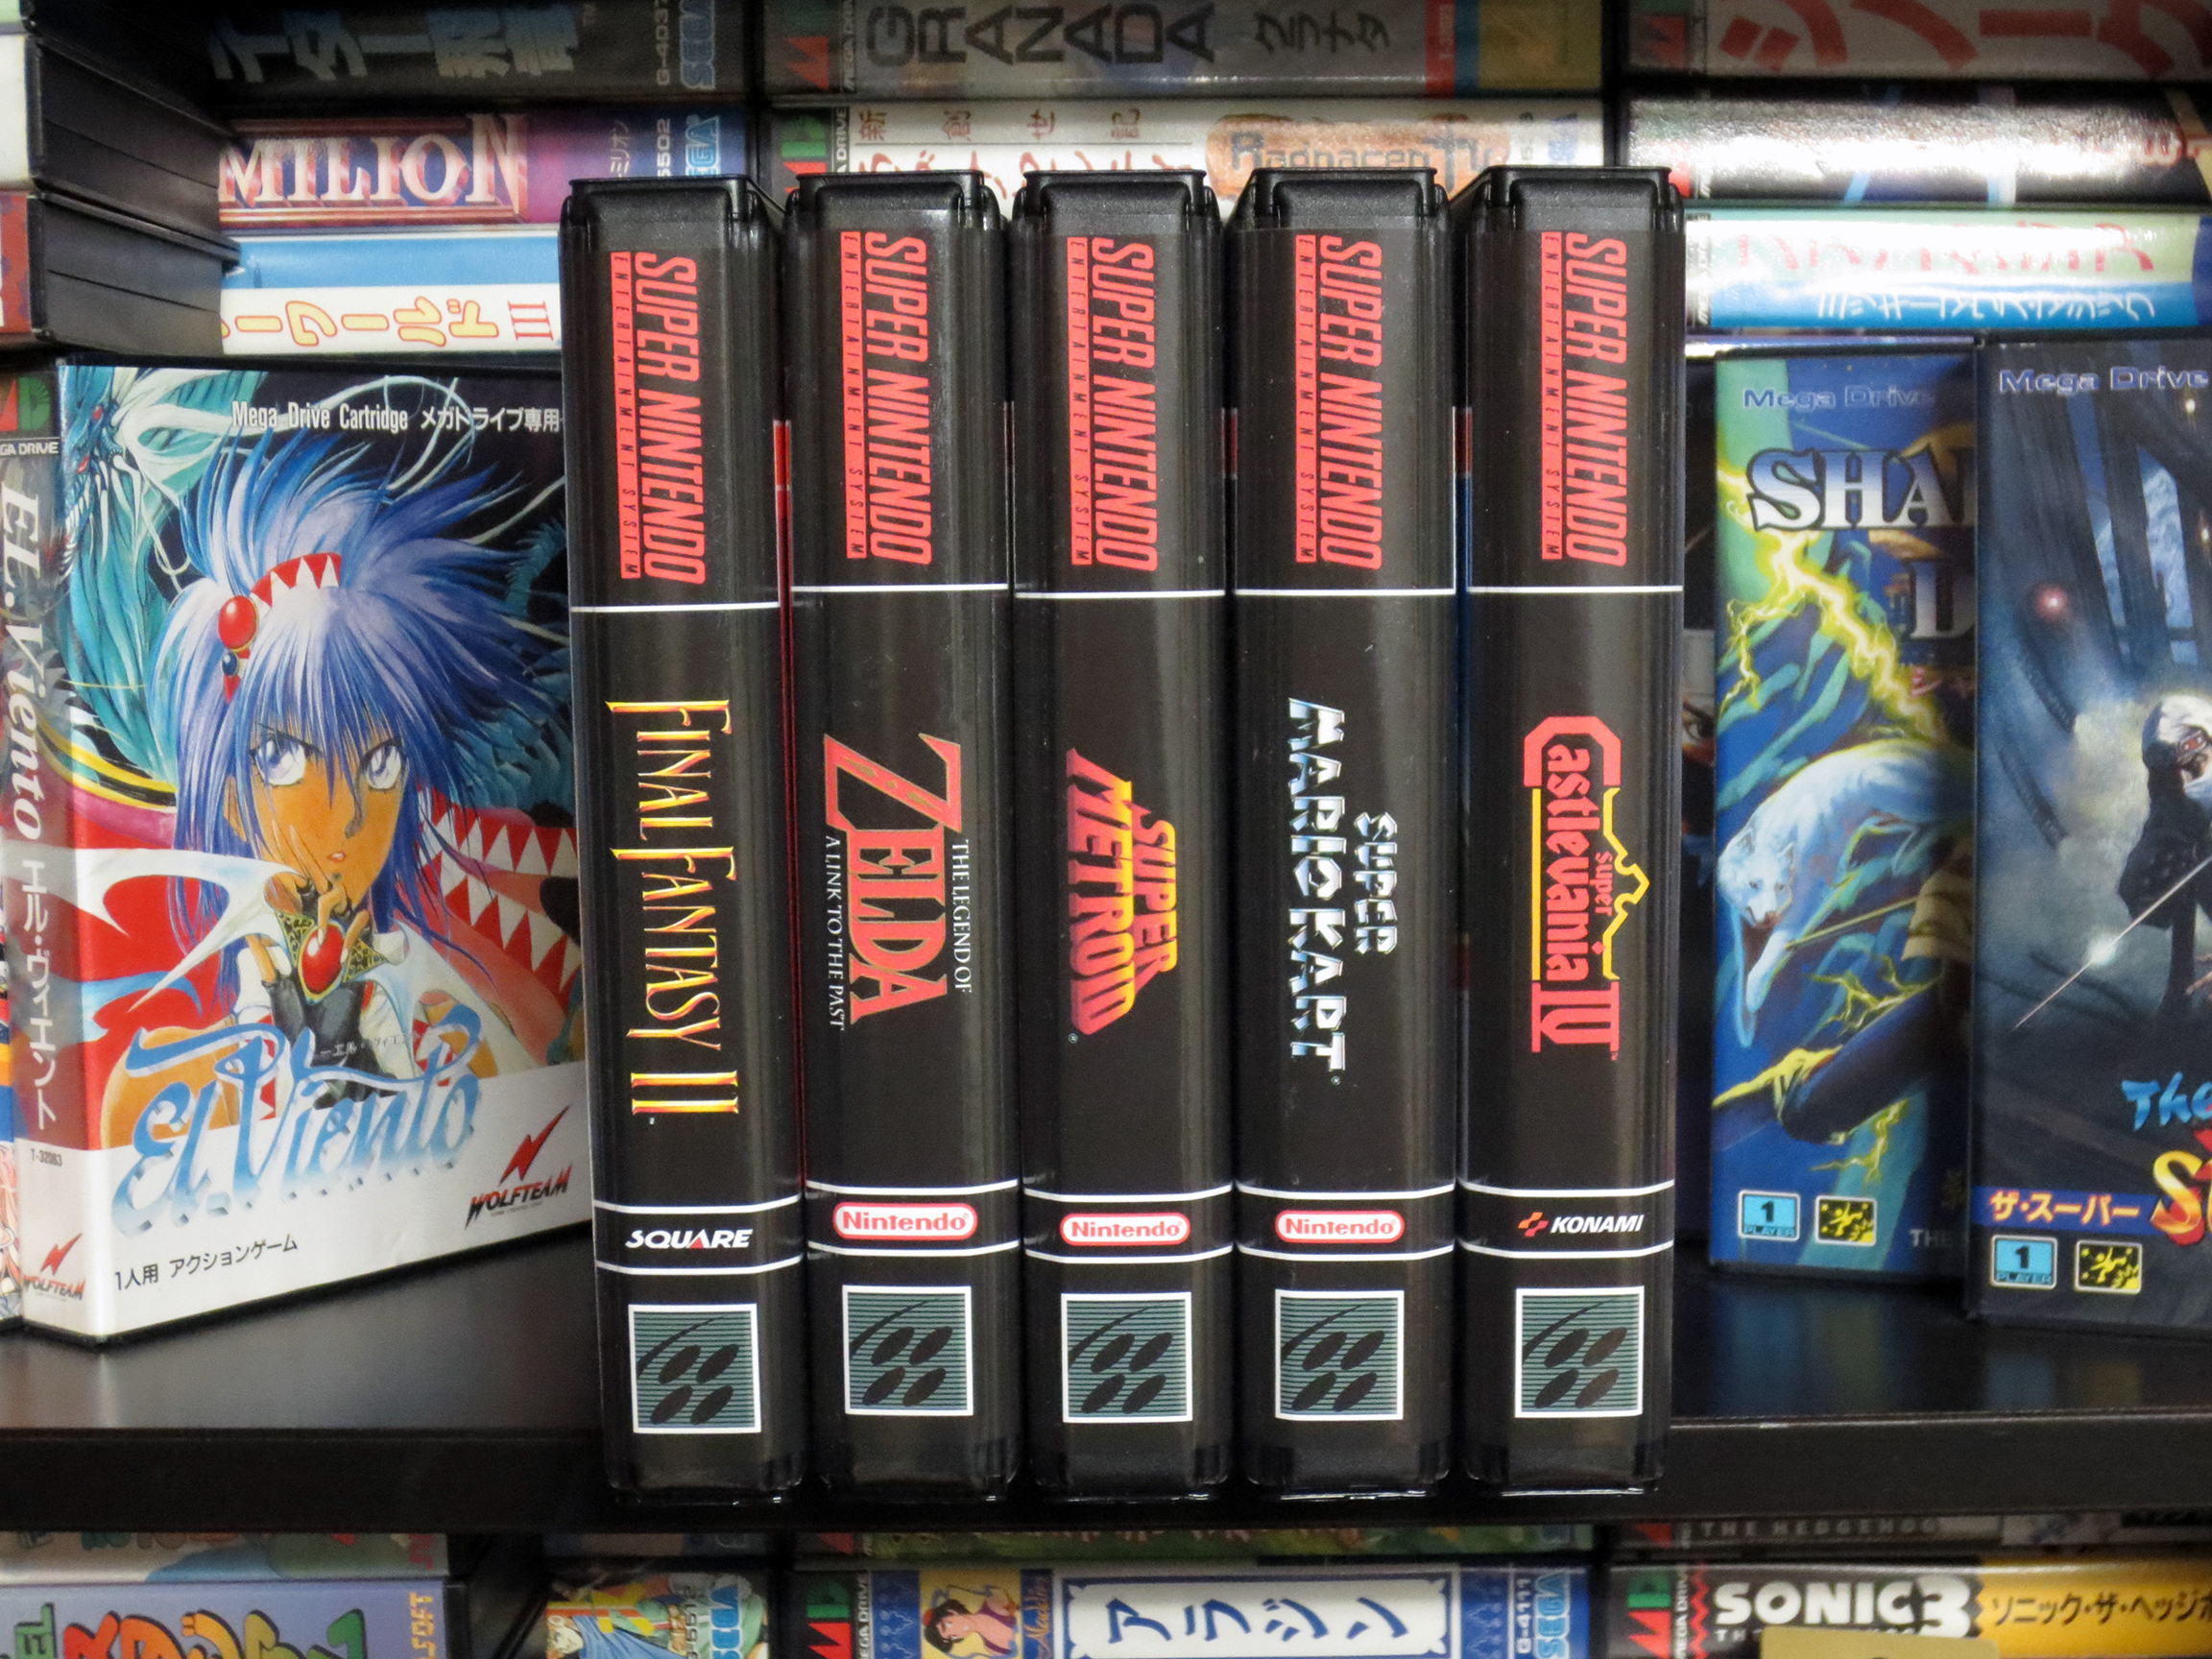 Looking neat and orderly!


 My Sony chip actually showed a different number. But I was still confident that I was in the right area of the Mother Board.